Storing the Scanned Document in the Machine and Sending the URL by E-mail
Store a scanned document in the machine and send the URL representing the document in an e-mail (URL link). You can download the document by clicking the URL in the e-mail text.
You can obtain the file via an e-mail even in an environment where attaching a file in an e-mail is restricted.
You can reduce the load on the server when distributing a document to many recipients or sending a document comprising many pages.

You can specify a password for each stored file. We recommend that you protect stored files from unauthorized access by specifying passwords.
Scan file stored in the machine may be lost if some kind of failure occurs. We advise against using the hard disk to store important files. The supplier shall not be responsible for any damage that may result from the loss of files.
Specifying the Conditions to Send a Document as a URL Link
Configure the settings on the [Sending Settings] under [Scanner Settings].

Select [On] in [Scanner Settings]
 [Sending Settings]
 [Email (URL Link)]
 [Download File Directly From URL Link] in advance.
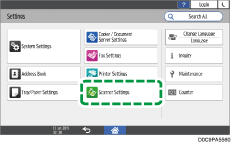
 Press [Settings] on the Home screen.
 Press [Scanner Settings].

 Press [Sending Settings]
 [Email (URL Link)]
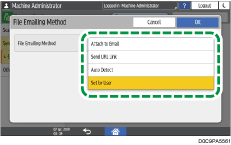
 [File Emailing Method] to display the configuration screen for the document transmission method.
 Select the transmission method.

Attach to Email: Attaches an image file to an e-mail.
Send URL Link: Documents are always sent as a URL link.
Auto Detect: A document is sent as a URL link automatically when the size of the e-mail to be sent including the attachment file exceeds 2 MB. You can change the maximum size of an e-mail to send a document as a URL link in [Scanner Settings]
 [Sending Settings]
 [Email (Size)]
 [Maximum Email Size].
Set by User: Select whether to send a document as a URL link by attaching it to an e-mail or by applying the automatically determined setting every time you send an e-mail.
 Press [OK].
 Press [Home] (
 ) after specifying the settings.
Sending the URL Link of a Document
When [Set by User] is specified in [Scanner Settings] [Sending Settings]
 [Email (URL Link)]
 [File Emailing Method], specify the method of sending the document in an e-mail.

Depending on your e-mail application, a phishing warning might appear after you receive an e-mail message. To prevent phishing warnings appearing after you receive e-mail from a specified sender, you must add the sender to your e-mail application's exclusion list. For details about how to do this, see your e-mail application's Help.
 Press [Scanner] on the Home screen.
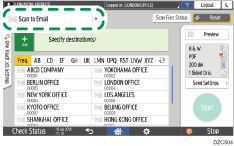
 Select [Scan to Email] on the scanner screen.

 Place the original on the scanner.
 Press [Send Settings] on the scanner screen.
 Press [Sender] and specify the sender.
 Press [File Emailing Method] and select [Send URL Link].
 Specify the scan settings according to the purpose of the scanned data.
Scanning an Original with Suitable Quality and Density
Specifying the File Type or File Name When Scanning a Document
 Specify the destination and then press [Start] on the scanner screen.

When [Auto Detect] is specified in [File Emailing Method], the machine automatically determines whether to send a document as a URL link or by attaching it to an e-mail according to the specified setting.
A document stored in the machine will be automatically deleted 24 hours after it has been stored. The storage period for the file represented by an URL link can be specified in [Scanner Settings]
 [Sending Settings]
 [Email (URL Link)]
 [URL File Storage Period].
You cannot specify a PDF with encryption or signature as the file format of the document when sending the document as a URL link in an e-mail.
