Specifying a User Code in the Printer Driver
When user code authentication is specified on the machine to limit use of the printer functions, specify the user code in the printer driver to authenticate print jobs on the machine.
Once the user code is specified, you do not need to enter it next time.
Specifying User Code (Windows)

To change the settings of [Printer Properties], you need the access privilege of [Management of this printer]. Log on your computer as a member of the Administrators Group to change the settings.
On machines with RICOH Always Current Technology v1.1 or earlier, when specifying user code, clear the [User Authentication] checkbox in the [Advanced Options] tab of [Printer Properties].
On machines installed with RICOH Always Current Technology v1.2 or later, when specifying user code, select [Off] for [User Authentication] in the [Advanced Options] tab of [Printer Properties].
 Display the [Devices and Printers] screen.
Windows 10 (version 1703 or later), Windows Server 2019
On the [Start] menu, click [Windows System]
 [Control Panel].
Click [View devices and printers].
Windows 10 (before version 1703), Windows Server 2016
Right-click [Start], and then click [Control Panel].
Click [View devices and printers].
Windows 8.1, Windows Server 2012/2012 R2
On the Charm Bar, click [Settings]
[Control Panel].Click [View devices and printers].
Windows 7, Windows Server 2012/2008 R2
On the [Start] menu, click [Devices and Printers].
Windows Server 2008
On the [Start] menu, click [Control Panel].
Select [Printer] on [Hardware and Sound].
 Right-click the printer icon, and then click [Printer Properties].
 Click the [General] tab
 ![]() [Preferences].
[Preferences].
 Click the [Basic] tab
 ![]() [User Code Setting...].
[User Code Setting...].
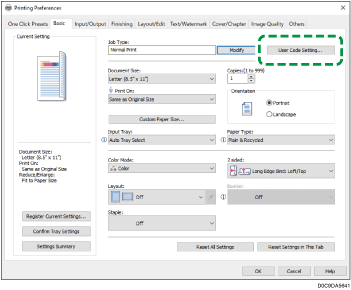
 Enter the user code.
 Click [OK].
 After completing the configuration, close the setting screen of the printer driver.
Specifying User Code (macOS)
Configure the settings on the [Job Log] menu in [Feature Sets] of [Printer Features].
Open a document to print on the computer, and display the setting screen of the printer driver from the print menu in the application.
Select [Printer Features].
In [Feature Sets], select [Job Log].
Select the [Enable User Code] check box, and then enter the user code.
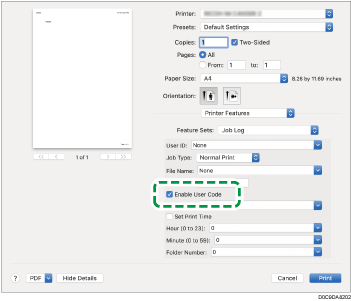
Click [Print].