Storing the Received Fax Documents in the Machine
By storing the received documents in the machine, you can:
Confirm the contents of the document on the control panel and print only the documents that require a hard copy.
Print the same document many times.
Download the documents as image files to a computer using Web Image Monitor.
Allow only the specified users to access stored reception files.
It is also possible to store the received documents automatically for a specified period or number of hours in the day only.
Changing the Fax Reception Behavior Based on the Time or Day of the Week

You cannot use received and stored documents with the Document Server function.
For the maximum values of the following items, see List of Maximum Values for Each Setting Item:
Number of received documents you can store on the machine's hard disk
Number of pages you can store in memory
Received confidential documents are stored in Personal Boxes.
Configuring the Machine to Store Received Documents
Specify [Store] in the [Reception Settings] under [Fax Settings].
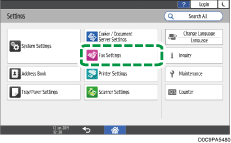
 Press [Settings] on the Home screen.
 Press [Fax Settings] on the Settings screen.
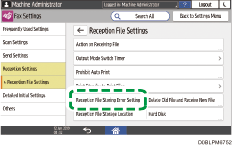
 Press [Reception Settings]
![]() [Reception File Settings]
[Reception File Settings]![]() [Action on Receiving File] to display the Action on Receiving File screen.
[Action on Receiving File] to display the Action on Receiving File screen.
 Select [On] in [Store].
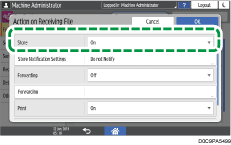
 Press [Store Notification Settings].
 Select [Notify] in [Store Notification].
 To send an e-mail notifying that a received fax has been stored in the machine, press [Notify Destination] and specify the destination.
 Press [Security], and then specify [Encryption] to apply or [Signature] to attach to the reception notification e-mail.
 To send a notification when the amount of memory used or number of received documents is approaching the upper limit, press [Email] in [Email Notification: Memory Almost Full].
The e-mail will be sent to the e-mail address of the administrator.
 Press [OK]
![]() [OK].
[OK].
 Press [Home] (
 ) after specifying the settings.
When [Store] is set to [On], you can apply a User Parameter (switch 40, bit 0) to stop the machine automatically receiving new faxes when available memory space runs too low.
For the maximum number of destinations you can register in a group, see List of Maximum Values for Each Setting Item.
Configuring the Machine Behavior When a Document Cannot Be Stored
When the number of stored documents reaches the upper limit or the available space in the memory is insufficient, the machine prints and deletes the oldest document from the storage to store the new received document. You can specify which of the following to perform in such a case:
Print Reception File Erased Report and delete the oldest document without printing
Do not receive a new document until the number of stored documents decreases or the amount of free space in the storage increases
When the machine is configured not to receive new documents until it can store documents, the setting to delete the oldest stored document is disabled.
Press [Settings] on the Home screen.
Press [Fax Settings] on the Settings screen.
Press [Reception Settings]![]() [Reception File Settings]
[Reception File Settings]![]() [Reception File Storing Error Setting] to display the Reception File Storing Error Setting screen.
[Reception File Storing Error Setting] to display the Reception File Storing Error Setting screen.
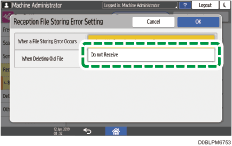
To receive new document after deleting the oldest received document
Select [Delete Old File and Receive New File] for [When a File Storing Error Occurs]
Select [Print Old File] or [Do not Print Old File but Print Report] for [When Deleting Old File].

When [Do not Print Old File but Print Report] is selected and received documents are deleted, the machine prints a report containing the destinations and reception dates of the deleted documents.
To not receive a new document
Select [Do not Receive] for [Reception File Storing Error Setting].
Press [OK].
Press [Home] () after specifying the settings.
Restricting the Users Who Can Access the Stored Reception Files
Specify a user to manage all stored reception files. You can view, print, or delete stored reception files from Web Image Monitor only when you are logged in as the administrative user.

Register the user to manage the received documents stored in the machine and specify the user code and login information.
Registering a User in the Address Book and Specifying the Login Information
The user who manages the received documents stored in the machine must be authorized to use fax and document box functions.
Verifying Users to Operate the Machine (User Authentication)
Press [Settings] on the Home screen.
Press [Fax Settings] on the Settings screen.
Press [Reception Settings]![]() [Stored Reception File User Setting] to display the Reception File User Settings screen.
[Stored Reception File User Setting] to display the Reception File User Settings screen.
Select [On] in [Stored Reception File User Setting], and then press [Specify User].
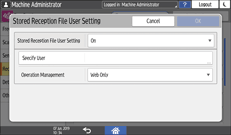
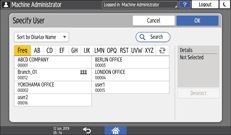
Specify the user to manage the stored reception files.
Checking the stored reception file is impossible when the selected user is deleted from the address book.
Press [OK].
Specify [Operation Management], and then press [OK].
Press [Home] () after specifying the settings.
Confirming/Printing/Deleting Stored Reception Files on the Control Panel
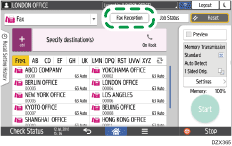
You can check the contents of received documents that are stored in the machine from [Fax Reception]![]() [Check Stored Reception File] on the fax screen.
[Check Stored Reception File] on the fax screen.
Press [Fax] on the Home screen.
Press [Fax Reception] on the fax screen.
Press [Check Stored Reception File].
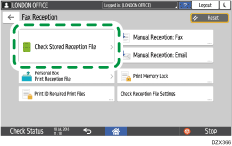
On the confirmation screen of stored reception files, confirm, print, or delete the document.
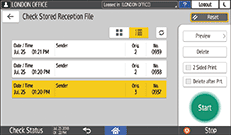
To confirm a document
Select the document and press [Preview].
Press
 to switch between the list of document names and thumbnail display.
If the size (length) of a received and stored document is larger than A4 or 81/2 × 14, the document is displayed in the preview as a single image, but it will be split and printed over several sheets.
If image files are corrupt, they are not displayed on the preview window.
To print a document
Select the document and press [Print].
You can specify whether to perform duplex printing and delete the document after printing.
For the maximum number of documents you can print at a time, see List of Maximum Values for Each Setting Item.
To delete a document
Select the document and press [Delete].
You cannot delete a document while another person is printing it using Web Image Monitor.
For the maximum number of documents you can delete at a time, see List of Maximum Values for Each Setting Item.
You cannot change to a different setting if received documents have been stored on the hard disk. To change to different setting, print documents stored on the hard disk if necessary, and then delete them.
Viewing/Printing/Deleting the Stored Documents from Web Image Monitor
You can view the contents of the stored documents from the [Print Job/Stored File] menu in Web Image Monitor. You can also download the stored documents to the computer.
It is recommended that you use Web Image Monitor running under the same network environment as this machine. Otherwise, the web browser may not open and an error may occur.
When entering an IPv4 address, do not begin segments with zeros. For example: If the address is "192.168.001.010", you must enter it as "192.168.1.10" to connect to the machine.
Start the Web browser on the computer.
Enter "http://(IP address or host name of the machine)/" in the address bar.
Log in to Web Image Monitor as the user viewing the stored reception file.
From the "Print Job/Stored File" menu, click "Fax Received File".
When the user to manage the received documents that are stored in the machine has been specified, enter the user code of the administrative user and click [OK].
View, print, or delete the stored document.
To print or delete a document
Select the document and click [Print] or [Delete].
To view or download a document
Click the properties icon
 of the document.
Check the contents of the document displayed on the screen.
To download the file, select the file format to save the document to the computer and click [Download].
Click [OK], and then close the Web browser.
When the e-mail notification for storing reception files is specified in [Fax Settings]
 [Reception Settings][Reception File Settings][Action on Receiving File][Store], click the URL described in the "Reception Report e-mail" that was sent to the notification destination to access the received document.
When printing on a large size paper, check the print settings in the application that you are using.