Printing a Mark or Information on the Received Fax
You can print marks and information on the printed pages of a received fax for filing and sorting.
The Types of the Printing Functions
Printing a checkered mark
Prints a checkered mark on the first page of the received fax. By printing a checkered mark on the first page of each document, you can easily collate documents when receiving more than one document at one time.

Printing a center mark
Prints a center mark in the center of the left and top margins of the received fax documents, lists, and reports. Use this mark as a guide when punching holes for filing the page.

Printing the reception time
Prints the reception time and document number in the bottom margin of the received fax.
This is printed only on the last page when dividing and printing over multiple pages.

Configuring the Printing Functions
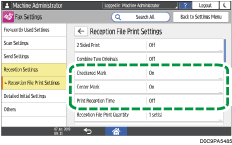
Configure the printing functions in the [Reception Settings] under [Fax Settings].
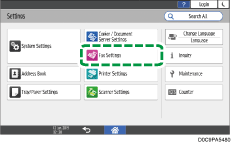
 Press [Settings] on the Home screen.
 Press [Fax Settings] on the Settings screen.

 Press [Reception Settings]
 [Reception File Print Settings]
 [Checkered Mark], [Center Mark] or [Print Reception Time].

 Press [On].
 Press [OK].
 Press [Home] (
 ) after specifying the settings.
Printing the Information Registered at the Origin of the Received Document
You can print the sender name (for display), sender fax number, or e-mail address that is registered in the device at the origin on the received fax. Even if the sender has sent the document while specifying not to print the sender's name (for print), you can easily identify its origin.
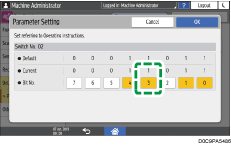
Enable the sender information print function in [Parameter Setting] under [Fax Settings].
 Press [Settings] on the Home screen.
 Press [Fax Settings] on the Settings screen.

 Press [Detailed Initial Settings]
 [Parameter Setting]
 [Parameter Setting] to display the switch operation screen.
 Select bit number [3], switch number [02], and change current value to "1".

 Press [OK].
 Press [Home] (
 ) after specifying the settings.
