Installing the Printer Driver to Print Using the WSD Port
To print using the WSD port, install the printer driver from the [Network] or [Devices and Printers] screen on the control panel.

You can connect to the printer only if both the printer and computer are on the same network segment, or "Network discovery" is enabled. For details, see Windows Help.
Installing the Driver under Windows 8.1/10 or Windows Server 2012/2012 R2/2016/2019
 Prepare the printer driver installer.
Set the CD-ROM on the computer or unzip the downloaded driver. If automatic reproduction begins, exit the installer.
 Display the [Devices and Printers] screen.
Windows 10 (version 1703 or later), Windows Server 2019
On the [Start] menu, click [Windows System]
 [Control Panel].
Click [View devices and printers].
Windows 10 (earlier than version 1703), Windows Server 2016
Right-click [Start], and then click [Control Panel].
Click [View devices and printers].
Windows 8.1, Windows Server 2012/2012 R2
On the Charm Bar, click [Set]
[Control Panel].Click [View devices and printers].
 Select a printer, and then click [Print server properties].
 Click [Add...] on the [Drivers] tab.

 Click [Next] on the [Add Printer Driver Wizard] screen.
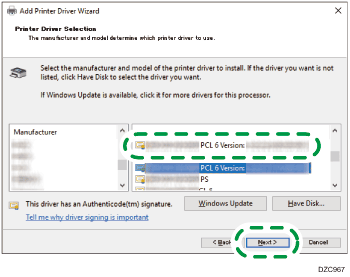
 Select the check box of the processor (CPU) of your computer, and then click [Next].
 Click [Have Disk...]
 ![]() [Browse...] to specify the driver (INF file), and then click [OK].
[Browse...] to specify the driver (INF file), and then click [OK].
If the CD-ROM drive is D:\, the file is stored in the following folder:
Driver
OS
Folder
PCL 6
32-bit driver
D:\X86\DRIVERS\PCL6\X86\MUI\DISK1
64-bit driver
D:\X64\DRIVERS\PCL6\X64\MUI\DISK1
PostScript 3
32-bit driver
D:\X86\DRIVERS\PS\X86\MUI\DISK1
64-bit driver
D:\X64\DRIVERS\PS\X64\MUI\DISK1
The downloaded file is stored in the "DISK1" folder.
 Select the machine you want to use, and then click [Next].
 Click [Finish]
 ![]() [Close].
[Close].
 Click [Add a printer] on the [Devices and Printers] screen.
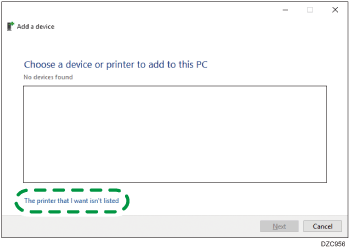
 Click [The printer that I want isn’t listed].
 Select [Add a Bluetooth, wireless or network discoverable printer], and then click [Next]
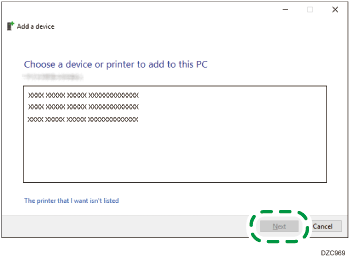
 Select the machine you want to use, and then click [Next].
 To use the printer as a shared printer, specify the shared printer settings, and then click [Finish].
Installing the Driver under Windows 7 or Windows Server 2008 R2
On the [Start] menu, click [Computer].
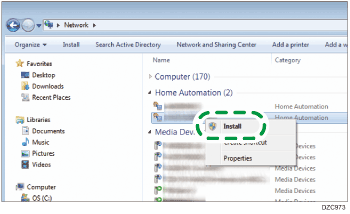
Click [Network].
The search for the machine starts.
Right-click the machine, and then click [Install].
If "Device driver software was not successfully installed" is displayed, close the message, and then proceed to Step 4.
On the [Start] menu, click [Devices and Printers].
Click [Add a printer].
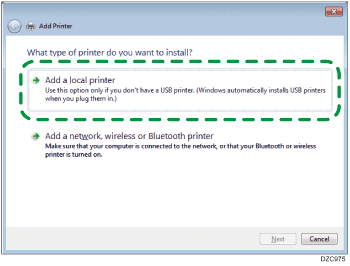
Click [Add a local printer].
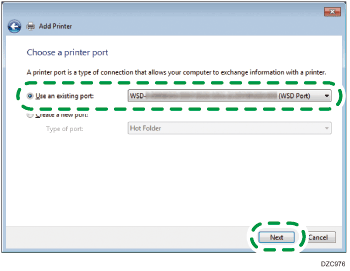
Select the WSD port on "Use an existing port:", and then click [Next].
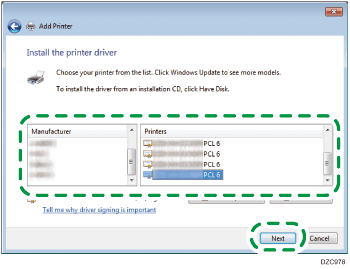
Click [Have Disk...] ![]() [Browse...] to specify the driver (INF file), and then click [OK].
[Browse...] to specify the driver (INF file), and then click [OK].
If the CD-ROM drive is D:\, the file is stored in the following folder:
Driver
OS
Folder
PCL 6
32-bit driver
D:\X86\DRIVERS\PCL6\X86\MUI\DISK1
64-bit driver
D:\X64\DRIVERS\PCL6\X64\MUI\DISK1
PostScript 3
32-bit driver
D:\X86\DRIVERS\PS\X86\MUI\DISK1
64-bit driver
D:\X64\DRIVERS\PS\X64\MUI\DISK1
The downloaded file is stored in the "DISK1" folder.
Select the machine you want to use, and then click [Next].
Follow the instructions on the screen to proceed with the installation.
When the installation is complete, close all windows.

To stop installation of the selected driver, click [Cancel] before the installation is complete. When re-installing the WSD Port, right-click the machine's icon in the [Network] window, and then click [Uninstall].
Installing the Driver under Windows Server 2008
On the start menu, click [Network].
The search for the machine starts.
Right-click the machine, and then click [Install].
Click [Locate and install driver software (recommended)].
If [Don't search online] is displayed, click the display, and then proceed to Step 4.
Click [Browse my computer for driver software (advanced)].
Click [Browse...] to specify the driver (INF file), and then click [Next].
If the CD-ROM drive is D:\, the file is stored in the following folder:
Driver
OS
Folder
PCL 6
32-bit driver
D:\X86\DRIVERS\PCL6\X86\MUI\DISK1
64-bit driver
D:\X64\DRIVERS\PCL6\X64\MUI\DISK1
PostScript 3
32-bit driver
D:\X86\DRIVERS\PS\X86\MUI\DISK1
64-bit driver
D:\X64\DRIVERS\PS\X64\MUI\DISK1
The downloaded file is stored in the "DISK1" folder.
When the installation is complete, close all windows.
The port name that follows "WSD" uses random character strings. It cannot be changed freely.
To stop the installation, click [Cancel] before the installation is complete. When re-installing the WSD Port, right-click the printer's icon in the [Network] window, and then click [Uninstall].