Registering Unique Names to Paper Types
You can register a unique name to a paper type using Web Image Monitor. Registering a name which represents paper type or usage allows you to easily specify the paper type appropriate for your purpose.
![]()
This function can be used when the machine is operating in a network and bidirectional communication is enabled.
Paper types with unique names registered using this function can only be specified using the PCL 5e/6 printer drivers.
The machine logs do not record the names of user paper types.
Registering Names to Paper Types
![]()
The printer driver might not display the paper type name correctly if it is registered using an unsupported language.
The control panel might not display the paper type name correctly if it is registered using non-alphanumeric characters (i.e., characters that are not one of the following: a–z, A–Z, or 0–9).
![]() Start the Web browser on the computer, and then enter "http://(IP address of the machine) or (host name)/" in the address bar to access the machine.
Start the Web browser on the computer, and then enter "http://(IP address of the machine) or (host name)/" in the address bar to access the machine.
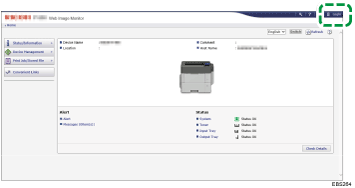
![]() On the top page of Web Image Monitor, click [Login], enter the login user name and login password, and then click [Login].
On the top page of Web Image Monitor, click [Login], enter the login user name and login password, and then click [Login].
Log in to the machine as the administrator.

![]() Click [Configuration] on the [Device Management] menu.
Click [Configuration] on the [Device Management] menu.
![]() Click [User Paper Type] in "Device Settings", and then change the settings as necessary.
Click [User Paper Type] in "Device Settings", and then change the settings as necessary.
![]() Enter a descriptive name for easier recognition in "Paper Name".
Enter a descriptive name for easier recognition in "Paper Name".
![]() Select a suitable paper type from the "Paper Type" list.
Select a suitable paper type from the "Paper Type" list.
![]() Click [OK].
Click [OK].
![]() Click [Logout].
Click [Logout].
![]() Quit Web Image Monitor.
Quit Web Image Monitor.
![]()
You can register up to eight user paper types.
Setting User Paper Types to Trays
Before printing, set the paper registered on the user paper type to the paper tray, and then set the paper type already registered. Paper types can be set either from Web Image Monitor or from the machine's control panel.
![]() Start the Web browser on the computer, and then enter "http://(IP address of the machine) or (host name)/" in the address bar to access the machine.
Start the Web browser on the computer, and then enter "http://(IP address of the machine) or (host name)/" in the address bar to access the machine.
![]() On the top page of Web Image Monitor, click [Login], enter the login user name and login password, and then click [Login].
On the top page of Web Image Monitor, click [Login], enter the login user name and login password, and then click [Login].
Log in to the machine as the administrator.

![]() Click [Configuration] on the [Device Management] menu.
Click [Configuration] on the [Device Management] menu.
![]() Click [Paper] in "Device Settings", and then change the settings as necessary.
Click [Paper] in "Device Settings", and then change the settings as necessary.
![]() Select [User Paper Type] for the paper tray you want to use, and then select the registered paper type.
Select [User Paper Type] for the paper tray you want to use, and then select the registered paper type.
![]() Click [OK].
Click [OK].
![]() Click [Logout].
Click [Logout].
![]() Quit Web Image Monitor.
Quit Web Image Monitor.
Printing Using Registered Paper Types
![]() After creating a document, open the [Printing Preferences] dialog box in the document's native application.
After creating a document, open the [Printing Preferences] dialog box in the document's native application.
![]() Select a registered paper type in the "Paper Type:" list.
Select a registered paper type in the "Paper Type:" list.
![]() Start printing from the application's [Print] dialog box.
Start printing from the application's [Print] dialog box.
