Connecting to a Wireless LAN
You can operate the machine from your computer when the machine is connected to an access point of a wireless LAN. Under normal use, such as when the machine is used from all computers on the same floor, connect the machine to an access point in the infrastructure mode.
Configuring connection in the infrastructure mode
The machine supports WPS (Wi-Fi Protected Setup) for configuration.
When the access point supports WPS, you can configure the connection by pressing the push button of the access point or entering the PIN code displayed on the machine in the access point from the computer.
When the access point does not support WPS or you are not certain whether it supports WPS, specify the SSID or encryption key of the access point manually.
In either case, you can perform setup in the wizard format or use manual setup in [Host Interface]. If you use "WPA2" for the security method of the access point, you cannot configure the connection from [Installation Settings]. In this case, configure the connection from [Host Interface].
![]()
The optional wireless LAN board is required to use this function.
Configuring the Infrastructure Mode in the Wizard Format
Configure the infrastructure mode on [Network Settings] of [Installation Settings].
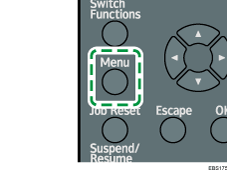
![]() Press the [Menu] key.
Press the [Menu] key.
![]() Select [Installation Settings], and then press the [OK] key.
Select [Installation Settings], and then press the [OK] key.
![]() Select [Network], and then press the [OK] key.
Select [Network], and then press the [OK] key.
![]() Select [LAN Settings], and then press the [OK] key.
Select [LAN Settings], and then press the [OK] key.
![]() Select [Wireless LAN], and then press the [OK] key.
Select [Wireless LAN], and then press the [OK] key.
![]() Select a connection method.
Select a connection method.
Select one of the methods from among [SSID/Password], [Push Button Method], and [PIN Code Method].
When you select [SSID/Password]
Select an access point or press the selection key beneath [Manual].
To select an access point, select the access point to use from the list of access points. If the key symbol is displayed, specify the security method and password. When you select [Manual], specify the network name, security method, and password of the access point to use.
When you select [Push Button Method]
By following the instructions on the screen, press the PUSH button of the access point (router) to connect to the network.
When you select [PIN Code Method]
By following the instructions on the screen, register the PIN code displayed on the screen of the machine to the access point (router). Use the computer connected to the access point to enter the PIN code. For details about entering the PIN code using the computer, see the user's manual of the access point.
![]() Confirm the message on the screen, and then press the selection key beneath [Exit].
Confirm the message on the screen, and then press the selection key beneath [Exit].
![]() Select [Direct Connection Settings], press the [OK] key, and then specify whether to enable a direct connection.
Select [Direct Connection Settings], press the [OK] key, and then specify whether to enable a direct connection.
When a direct connection is enabled, you can access the machine from a smart device. Proceed to the setting of the USB connection as necessary.
![]() Press the selection key beneath [Exit].
Press the selection key beneath [Exit].
![]() Confirm the message on the screen, and then press the selection key beneath [Exit].
Confirm the message on the screen, and then press the selection key beneath [Exit].
![]() Press the selection key beneath [Exit].
Press the selection key beneath [Exit].
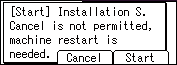
![]() Confirm the message on the screen, and then press the selection key beneath [Restart].
Confirm the message on the screen, and then press the selection key beneath [Restart].
![]()
If the item you want to select is not displayed on the screen, press the [
 ] or [
 ] key on the control panel to change the screen.
Configuring the Infrastructure Mode on System Settings
Configure the infrastructure mode on [Network] of [Host Interface]. When the access point you use supports WPS, you do not need to specify the encryption key or security method of the access point.
Configuring the connection using WPS
![]() Press the [Menu] key.
Press the [Menu] key.
![]() Select [Host Interface], and then press the [OK] key.
Select [Host Interface], and then press the [OK] key.
![]() Select [Wireless LAN], and then press the [OK] key.
Select [Wireless LAN], and then press the [OK] key.
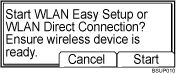
![]() Select [WLAN:EasySetup/Direct Con], and then press the [OK] key.
Select [WLAN:EasySetup/Direct Con], and then press the [OK] key.
Using the WPS button
When the access point is within arm's reach, use the WPS button.
![]() Select [Push Button Method], and then press the [OK] key.
Select [Push Button Method], and then press the [OK] key.
![]() Press the selection key beneath [Start], and then press the WPS button on the access point (router) within 2 minutes.
Press the selection key beneath [Start], and then press the WPS button on the access point (router) within 2 minutes.
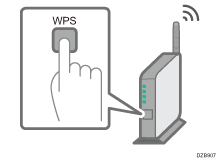
The connection message is displayed.
Using the PIN code
If the access point is located out of your reach such as on a high wall or shelf top, or the machine is not connected to the access point by pressing the WPS button, use the PIN code.
![]() Prepare a computer that can connect to the access point.
Prepare a computer that can connect to the access point.
![]() Select [PIN Code Method], and then press the [OK] key.
Select [PIN Code Method], and then press the [OK] key.
![]() Press the selection key beneath [Start].
Press the selection key beneath [Start].
![]() Display the management screen of the access point on the computer and enter the PIN code displayed on the machine.
Display the management screen of the access point on the computer and enter the PIN code displayed on the machine.
The connection message is displayed.
For details about entering the PIN code using the computer, see the user's manual of the access point.
![]() Press the [Escape] key.
Press the [Escape] key.
Configuring the connection manually
Confirm the SSID, encryption key and security method specified in the access point, and then follow the procedure below.
The encryption key may be written as "network key", "PSK", or "passphrase".
![]() Press the [Menu] key.
Press the [Menu] key.
![]() Select [Host Interface], and then press the [OK] key.
Select [Host Interface], and then press the [OK] key.
![]() Select [Wireless LAN], and then press the [OK] key.
Select [Wireless LAN], and then press the [OK] key.
![]() Select [SSID Setting], and then press the [OK] key.
Select [SSID Setting], and then press the [OK] key.
![]() Press the selection key beneath [SSID].
Press the selection key beneath [SSID].
![]() Press the selection key beneath [Enter].
Press the selection key beneath [Enter].
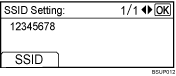
![]() Press the [], [], [
Press the [], [], [ ] or [
 ] key to select a character, and then press the [OK] key to enter the SSID that you want to connect to.
![]() Press the selection key beneath [Accept] when you finish entering the SSID.
Press the selection key beneath [Accept] when you finish entering the SSID.
![]() Select [Security Method], and then press the [OK] key.
Select [Security Method], and then press the [OK] key.
![]() Select the security method that is specified for the access point you want to connect to.
Select the security method that is specified for the access point you want to connect to.
![]() Press the selection key beneath [Details], and enter your password.
Press the selection key beneath [Details], and enter your password.
If you selected [WEP], enter the encryption key specified in the access point.
If you selected [WPA2], select the authentication method specified in the access point ([WPA2-PSK] or [WPA2]), and then enter the encryption key.
![]() Select the security method that is specified for the access point you want to connect to, and then press the [OK] key.
Select the security method that is specified for the access point you want to connect to, and then press the [OK] key.
![]() Select [Wireless LAN Signal], and then press the [OK] key to check the connection status.
Select [Wireless LAN Signal], and then press the [OK] key to check the connection status.
![]() Press the [Escape] key.
Press the [Escape] key.
![]()
If the item you want to select is not displayed on the screen, press the [
] or [] key on the control panel to change the screen.
Using the Ad-hoc Mode
To connect the machine and computer without going through an access point, configure the ad-hoc mode in [Network] of [Host Interface].
![]() Press the [Menu] key.
Press the [Menu] key.
![]() Select [Host Interface], and then press the [OK] key.
Select [Host Interface], and then press the [OK] key.
![]() Select [Wireless LAN], and then press the [OK] key.
Select [Wireless LAN], and then press the [OK] key.
![]() Select [Communication Mode], and then press the [OK] key.
Select [Communication Mode], and then press the [OK] key.
![]() Select [802.11 Ad-hoc Mode], and then press the [OK] key.
Select [802.11 Ad-hoc Mode], and then press the [OK] key.
![]() Select [SSID Setting], and then press the [OK] key.
Select [SSID Setting], and then press the [OK] key.
![]() Press the selection key beneath [Enter].
Press the selection key beneath [Enter].
![]() Press the [], [], [] or [] key to select a character, and then press the [OK] key to enter the SSID.
Press the [], [], [] or [] key to select a character, and then press the [OK] key to enter the SSID.
The SSID entered here is displayed on the computer.
![]() Press the selection key beneath [Accept] when you finish entering the SSID.
Press the selection key beneath [Accept] when you finish entering the SSID.
![]() Select [Ad-hoc Channel], and then press the [OK] key.
Select [Ad-hoc Channel], and then press the [OK] key.
![]() Press the [], [], [] or [] key to select a channel, and then press the [OK] key.
Press the [], [], [] or [] key to select a channel, and then press the [OK] key.
Select the channel that accommodates the type of the wireless LAN supported on the computer.
When using IEEE 802.11 b/g (2.4GHz)
1, 2, 3, 4, 5, 6, 7, 8, 9, 10, 11
If the connection is poor or the communication speed is extremely slow, change the channel.
![]() Select [Security Method], and then press the [OK] key.
Select [Security Method], and then press the [OK] key.
![]() Select [WEP], and then press the selection key beneath [Details].
Select [WEP], and then press the selection key beneath [Details].
![]() Press the [], [], [] or [] key to select a character, and then press the [OK] key to enter the WEP key.
Press the [], [], [] or [] key to select a character, and then press the [OK] key to enter the WEP key.
![]() Press the selection key beneath [Accept].
Press the selection key beneath [Accept].
![]() Select [WEP], and then press the [OK] key.
Select [WEP], and then press the [OK] key.
![]() Select [Wireless LAN Signal], and then press the [OK] key to check the connection status.
Select [Wireless LAN Signal], and then press the [OK] key to check the connection status.
![]() Press the [Escape] key.
Press the [Escape] key.
![]()
If the item you want to select is not displayed on the screen, press the [
] or [] key on the control panel to change the screen.