Making a Partial Print as a Test and Printing the Rest of the Document
You can test print the first set of a multiple-set print job. After you have checked the result, print the rest of the sets from the control panel (Sample Print). Sample Print can reduce misprints due to mistakes in contents or settings.
![]() Open a document to print on the computer, and display the setting screen of the printer driver from the print menu in the application.
Open a document to print on the computer, and display the setting screen of the printer driver from the print menu in the application.
![]() Specify Paper Size, Paper Type, Orientation of the document and other settings.
Specify Paper Size, Paper Type, Orientation of the document and other settings.
![]() Configure the job type.
Configure the job type.
Windows
Specify the settings on the [Frequently Used Settings] tab.
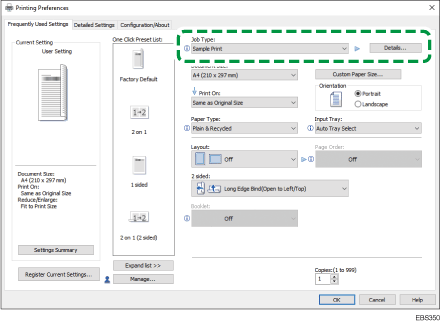
Job Type: Select [Sample Print].
Details...: Enter your user ID.
User ID: A user ID is displayed on the control panel to show the owner of the document. Specify whether to enter a user ID or to use the Windows logon name as a user ID.
Enter User ID: Enter a user ID using up to eight single-byte alphanumeric characters.
OS X/macOS
Specify the settings on [Job Log].
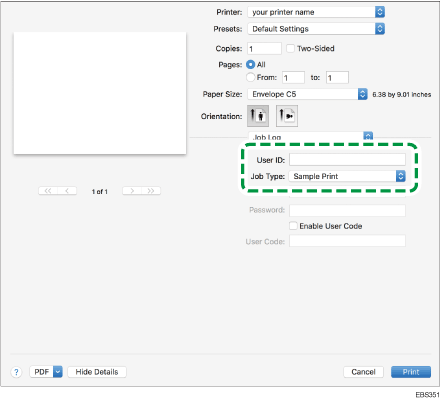
User ID: A user ID is displayed on the control panel to show the owner of the document. Enter a user ID using up to eight single-byte alphanumeric characters to identify the owner of the document.
Job Type: Select [Sample Print].
![]() Enter the print quantity.
Enter the print quantity.
![]() After completing the configuration, execute print.
After completing the configuration, execute print.
The machine prints only one set of a print job.
![]() Check the print result.
Check the print result.
If you do not need to change the contents or settings, proceed to print the rest of the document.
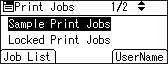
![]() Select [Sample Print Jobs], and then press the selection key beneath [Job List].
Select [Sample Print Jobs], and then press the selection key beneath [Job List].
![]() Select the file to print, and then press the selection key beneath [Print].
Select the file to print, and then press the selection key beneath [Print].
To change the print quantity, specify the number in the [Quantity] box.
![]() Press the selection key beneath [Print].
Press the selection key beneath [Print].
![]()
The print files that are printed or deleted using Web Image Monitor after you have selected them using the control panel will appear in [Job List]. However, an error message will appear if you try to print or delete those files.
To stop printing, press the [Job Reset] key. The files are deleted when the [Job Reset] key is pressed.
If the item you want to select is not displayed on the screen, press the [
 ] or [
 ] key on the control panel to change the screen.