Sending a Custom Size Original by Fax
Register the scan size when scanning and sending a custom size original or only a section of an original.
![]()
You can program up to 2 scan sizes (Program Size 1 and Program Size 2).
Programming a Custom Size
Press [Fax Settings]![]() [Scan Settings] and then press [Program/Change Scan Size] to program custom sizes.
[Scan Settings] and then press [Program/Change Scan Size] to program custom sizes.
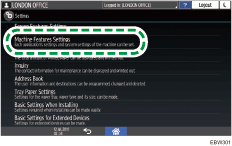
![]() Press [Settings] on the Home screen.
Press [Settings] on the Home screen.
![]() Press [Machine Features Settings] on the Settings screen.
Press [Machine Features Settings] on the Settings screen.
![]() Press [Fax Settings]
Press [Fax Settings]![]() [Scan Settings]
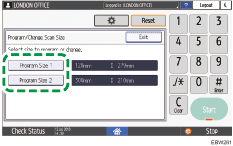
[Scan Settings]![]() [Program/Change Scan Size] to display the screen for programming custom sizes.
[Program/Change Scan Size] to display the screen for programming custom sizes.
![]() Press [Program Size 1] or [Program Size 2].
Press [Program Size 1] or [Program Size 2].
![]() Press [Horizontal], and then enter the horizontal size.
Press [Horizontal], and then enter the horizontal size.
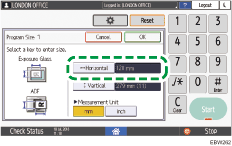
To switch the unit, press [mm] or [inch].
![]() Press [Vertical], select the vertical size, and then press [OK].
Press [Vertical], select the vertical size, and then press [OK].
![]() Press [Home] (
Press [Home] ( ) after specifying the settings.
![]()
To change the programmed custom size, select the size to change in Step 4.
To delete a registered custom size, press [Fax Settings]
 [Scan Settings][Delete Scan Size] select the custom size to delete press [Delete].
Sending a Document in a Programmed Custom Size
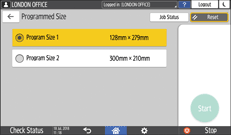
You can select a programmed custom size from [Settings]![]() [Scan Size]
[Scan Size]![]() [Programmed Size] on the fax screen.
[Programmed Size] on the fax screen.
![]() Press [Fax] on the Home screen.
Press [Fax] on the Home screen.
![]() Place the original in the Auto Document Feeder (ADF) or on the exposure glass.
Place the original in the Auto Document Feeder (ADF) or on the exposure glass.
Setting an Original to Send by Fax on the Scanner
To change the scan size on the middle page while scanning a document, set an original on the exposure glass.
![]() Press [Settings] on the Fax screen.
Press [Settings] on the Fax screen.
![]() Press [Scan Size]
Press [Scan Size]![]() [Programmed Size], and then select the scan size.
[Programmed Size], and then select the scan size.
![]() Configure the scan settings.
Configure the scan settings.
Sending a Fax at the Image Quality Suitable for the Original
![]() After configuring the send settings, specify the destination on the fax screen, and send the fax.
After configuring the send settings, specify the destination on the fax screen, and send the fax.
When scanning on the exposure glass, you can change the scan size per page.