 Confirming the User Name and Computer Name
Confirm the user name and the name of the computer you will send scanned documents to.
![]() On the [Start] menu, click [Windows System], and then click [Command Prompt].
On the [Start] menu, click [Windows System], and then click [Command Prompt].
![]() Enter the command "ipconfig /all", and then press the [Enter] key.
Enter the command "ipconfig /all", and then press the [Enter] key.
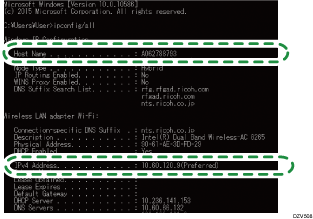
![]() Confirm the name of the computer, the active settings of the DHCP server, and the IPv4 address, and then write them in [1] on the check sheet.
Confirm the name of the computer, the active settings of the DHCP server, and the IPv4 address, and then write them in [1] on the check sheet.
The computer's name is displayed under [Host Name].
The address displayed under [IPv4 Address] is the IPv4 address of the computer.
Active settings of DHCP server are displayed under [DHCP Enabled].
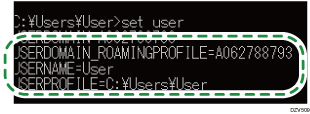
![]() Next, enter the command "set user", and then press the [Enter] key.
Next, enter the command "set user", and then press the [Enter] key.
Be sure to put a space between "set" and "user".
![]() Confirm the domain name/working group name and the user name, and then write them in [2] on the check sheet.
Confirm the domain name/working group name and the user name, and then write them in [2] on the check sheet.
The user name is displayed under [USERNAME].
Confirm the computer's login password and write it in [3] on the check sheet.
Next, create a shared folder on a computer. For details about creating a shared folder, see  Creating a Shared Folder on a Computer.
![]()
Depending on the operating system or security settings, it might be possible to specify a user name that does not have a password assigned. However, we recommend that for greater security you select a user name that has a password.