Guide to Components
This section introduces the names of the various parts on the front and rear side of the machine and outlines their functions.
You can use the ADF on M 2701 and G1127.
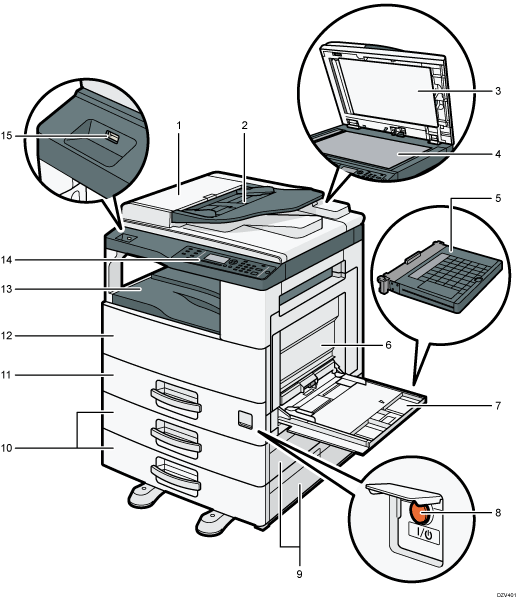
Exterior: Front View

No. | Name | Description |
|---|---|---|
1 | ADF Cover | Open this cover to remove originals jammed in the ADF. |
2 | Input Tray for the ADF | Place stacks of originals here. They will feed in automatically. This tray can hold up to 40 sheets of A3 or 11 × 17 size paper, and hold up to 50 sheets of paper other than A3 or 11 × 17 size. |
3 | Auto Document Feeder (Exposure Glass Cover) | The ADF is integrated with the exposure glass cover. Open this cover to place originals on the exposure glass. |
4 | Exposure Glass | Place originals here sheet by sheet. |
5 | Bypass Tray Cover | Attach this cover to the bypass tray to keep dust out. |
6 | Right Cover | Open this cover when a paper jam occurs. To open this cover, first open the bypass tray. |
7 | Bypass Tray | This tray can hold up to 100 sheets of plain paper. |
8 | Power Switch | To operate the machine, the power switch must be on. If it is off, open the power switch's cover and turn the switch on. |
9 | Tray 2 Right Cover/Tray 3 Right Cover | Open this cover when a paper jam occurs. |
10 | Trays 2–3 (option) | This tray can hold up to 500 sheets of plain paper. |
11 | Tray 1 | This tray can hold up to 500 sheets of plain paper. |
12 | Front Cover | Open this cover to replace the print cartridge. |
13 | Internal Tray | Printed paper is output here. Up to 250 sheets of plain paper can be stacked here. |
14 | Control Panel | Contains a screen and keys for machine control. |
15 | USB Flash Memory Device Port | Insert a USB flash memory device to store scanned files using the Scan to USB function. |
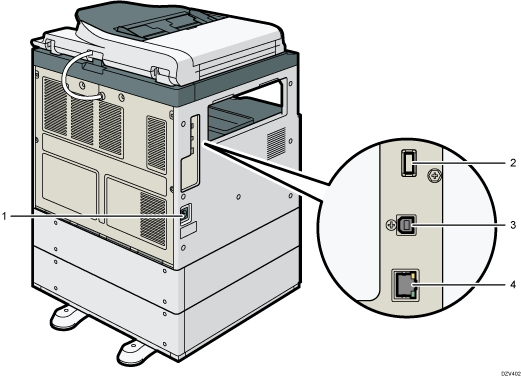
Exterior: Rear View

No. | Name | Description |
|---|---|---|
1 | Power Socket | For connecting the power cord to the machine. |
2 | USB Port for wireless LAN option | Insert the wireless LAN option to connect with a wireless LAN when the machine's power is turned off. |
3 | USB Port | For connecting the machine to a computer using a USB cable. |
4 | Ethernet Port | For connecting the machine to the network using a network interface cable. |
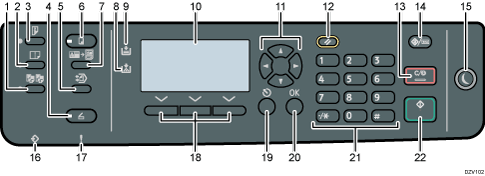
Control Panel

No. | Name | Description |
|---|---|---|
1 | [Sort] key | Press to assemble copies as sets in sequential order. |
2 | [Combine] key | Press to combine two one-sided originals or one two-sided original to one side of a sheet. |
3 | [Duplex] key | Press to print on both sides of paper. |
4 | [Scanner] key | Press to switch the machine to scanner mode. |
5 | [Folder Print] key | Press to enter Folder Print mode for the current job. |
6 | [Copy] key | Press to switch the machine to copier mode. Note that the machine does not return to copier mode if you press this key while you are performing menu operations in the menus that open when you press the [ID Card Copy] key or [Folder Print] key. |
7 | [ID Card Copy] key | Press to enter ID card copy mode for the current job. |
8 | Add Toner Indicator | Flashes when the print cartridge is almost empty. Lights up when the machine runs out of toner. |
9 | Load Paper Indicator | Lights up when the machine runs out of paper. |
10 | Screen | Displays the current status and messages. |
11 | Scroll Keys | Press to move the cursor in the direction indicated by the key. Pressing the [ Pressing the [ |
12 | [Reset] key | Press to clear the current settings. |
13 | [Clear/Stop] key |
|
14 | [User Tools/Counter] key | Press to display the menu for configuring the machine's system settings. You can also check or print the counter value. If you press this key while performing various settings, the machine returns to the initial screen. |
15 | [Energy Saver] key | Press to enter Energy Saver mode 1 or Energy Saver mode 2. Press this key again while the machine is in either Energy Saver mode 1 or Energy Saver mode 2 to exit the Energy Saver mode. When the machine is in Energy Saver mode 1, the [Energy Saver] key lights up. When the machine is in Energy Saver mode 2, the [Energy Saver] key flashes slowly. |
16 | Data In Indicator | This indicator flashes when the machine receives print data from a host device. This indicator lights up when there is a Locked Print file stored in the machine. |
17 | Alert Indicator | Flashes when the toner is nearly empty, or lights up when the machine runs out of toner or a machine error occurs. |
18 | Selection keys | Press the key underneath an item shown on the bottom line of the screen to select it. |
19 | [Escape] key | Press to cancel the last operation or to return to the previous level of the menu tree. |
20 | [OK] Key | Press to confirm settings and specified values, or to move to the next menu level. |
21 | Number Keys | Press to enter numerical values when specifying settings such as copy quantities or to enter letters when specifying names. |
22 | [Start] key | Press to start scanning or copying. |
