Distributing Data Using Distributed Scan Management
Configure the distributed scan management (DSM) system on Windows Server.
For the procedure to configure DSM, see Windows Server Help.
Up to 100 destinations can be displayed in [DSM Destination]. If more than 100 scan processes (destinations) are registered to Windows Server, information for the 100 processes that have been registered recently will be displayed in [DSM Destination].
The program function cannot be used with DSM.
![]() Press [Machine Features].
Press [Machine Features].
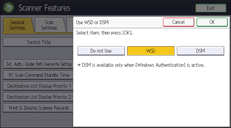
![]() In [Scanner Features], on the [General Settings] tab, press [Use WSD or DSM], and then press [DSM].
In [Scanner Features], on the [General Settings] tab, press [Use WSD or DSM], and then press [DSM].

![]() Login to the machine using Windows authentication.
Login to the machine using Windows authentication.
![]() Press [Home] (
Press [Home] ( ) at the bottom of the screen in the center.
![]() Press the [Scanner (Classic)] icon.
Press the [Scanner (Classic)] icon.
![]() Make sure that no previous settings remain.
Make sure that no previous settings remain.
If a previous setting remains, press [Reset].
![]() Press [DSM Destination].
Press [DSM Destination].
![]() Place originals.
Place originals.
![]() If necessary, specify the scan settings according to the original to be scanned.
If necessary, specify the scan settings according to the original to be scanned.
To change the scan settings, select the [Allow value override at scanner] check box when configuring the device on Windows Server.
![]() Specify the destination.
Specify the destination.
![]() Press [Start].
Press [Start].
