Enabling the Encryption Settings
![]()
The machine cannot be operated while data is being encrypted.
Once the encryption process starts, it cannot be stopped. Make sure that the machine's main power is not turned off while the encryption process is in progress. When the optional hard disk is installed, the hard disk will be damaged and all data on it will be unusable if the machine's main power is turned off during the encryption process.
The encryption key is required for data recovery if the machine malfunctions. Be sure to store the encryption key safely for retrieving backup data.
Encryption starts after you have completed the control panel procedure and rebooted the machine by turning the main power switch off and on. If both the Erase All Memory function and the encryption function are specified, encryption starts after the data that is stored on the hard disk has been overwritten and the machine has been rebooted by turning the main power switch on and off.
When the optional hard disk is installed, the process will take up to 6 hours 45 minutes if you use Erase All Memory and encryption simultaneously, and select overwrite 3 times for "Random Numbers". Re-encrypting from an already encrypted state takes the same amount of time.
The "Erase All Memory" function also clears the machine's security settings, so that neither machine nor user administration will be possible. Ensure that users do not save any data on the machine after "Erase All Memory" has completed.
When the optional hard disk is installed, rebooting will be faster if there is no data to carry over to the hard disk and if encryption is set to [Format All Data], even if all data on the hard disk is formatted. Before you perform encryption, we recommend you back up important data such as documents stored on the hard disk.
![]() Press the [Menu] key.
Press the [Menu] key.
![]() Log in as the machine administrator.
Log in as the machine administrator.
For details on how to log in, see Administrator Login Method.
![]() Press the [
Press the [ ] or [
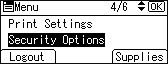
 ] key to select [Security Options], and then press the [OK] key.
![]() Press the [] or [] key to select [Machine Data Encryption], and then press the [OK] key.
Press the [] or [] key to select [Machine Data Encryption], and then press the [OK] key.
![]() Make sure that [Encrypt] is selected, and then press the [OK] key.
Make sure that [Encrypt] is selected, and then press the [OK] key.
When the optional hard disk is not installed, proceed to Step 7.
When the optional hard disk is installed, proceed to Step 6.
![]() Press the [] or [] key to select the data to be carried over to the hard disk and not be reset, and then press the [OK] key.
Press the [] or [] key to select the data to be carried over to the hard disk and not be reset, and then press the [OK] key.
To carry all of the data over to the hard disk, select [Carry Over All Data].
To carry over only the machine settings data, select [CarryOver FileSys DataOnly].
To reset all of the data, select [Format All Data].
![]() Select how to back up the encryption key.
Select how to back up the encryption key.
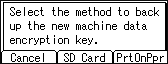
To back up the encryption key to an SD card, proceed to Step 8.
To print the encryption key on paper, proceed to Step 10.
![]() Press the selection key beneath [SD Card], and then insert an SD card into the upper media slot on the back of the machine.
Press the selection key beneath [SD Card], and then insert an SD card into the upper media slot on the back of the machine.
For details about handling and inserting the SD card, see "Installing SD Card Options", Setup.
![]() Press the selection key beneath [OK], and then proceed to Step 14.
Press the selection key beneath [OK], and then proceed to Step 14.
![]() Press the selection key beneath [PrtOnPpr].
Press the selection key beneath [PrtOnPpr].
![]() Press the selection key beneath [Print].
Press the selection key beneath [Print].
![]() Press the selection key beneath [Continue].
Press the selection key beneath [Continue].
![]() Press the selection key beneath [Exit].
Press the selection key beneath [Exit].
![]() Log out.
Log out.
For details about logging out, see Administrator Logout Method.
![]() Turn off the main power switch, and then turn the main power switch back on.
Turn off the main power switch, and then turn the main power switch back on.
The machine will start to convert the data on the memory after you turn on the machine. Wait until the message “Memory conversion complete. Turn the power switch off.” appears, and then turn the main power switches off again.
For details about turning off the power, see "Turning On/Off the Power", For First-time Users.