When "There is a Job printing now." is Displayed
Delete the printing job following the procedures described below, and then install the printer driver again.
![]()
Administrator permission is required to stop the Print Spooler. Log on as an Administrators group member.
![]() Display the "Devices and Printers" screen.
Display the "Devices and Printers" screen.
Windows 10 (version 1703 or later)
On the [Start] menu, click [Windows System]
 [Control Panel].
Click [View devices and printers].
Windows 10 (earlier than version 1703), Windows Server 2016
Right-click [Start], and then click [Control Panel].
Click [View devices and printers].
Windows 8.1, Windows Server 2012/2012 R2
On the Charm Bar, click [Set]
[Control Panel].Click [View devices and printers].
Windows 7, Windows Server 2008 R2
On the [Start] menu, click [Devices and Printers].
Windows Server 2008
On the [Start] menu, click [Control Panel].
Click [Printer] on [Hardware and Sound].
![]() Right-click the printer on which a printing job is remaining, and then click [See what’s printing].
Right-click the printer on which a printing job is remaining, and then click [See what’s printing].
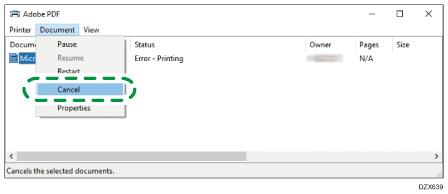
![]() Select the remaining job, and click [Document]
Select the remaining job, and click [Document] ![]() [Cancel].
[Cancel].
![]() On the screen confirming whether to cancel the job, click [Yes].
On the screen confirming whether to cancel the job, click [Yes].
![]() Close the print job screen and the properties.
Close the print job screen and the properties.
If the job was deleted in Step 4, the procedure is completed.
If the job was not deleted, proceed to the next step.
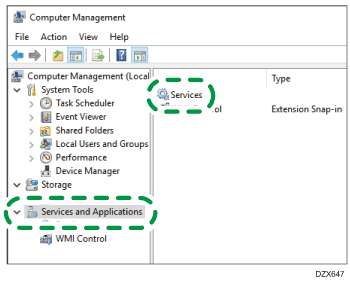
![]() Right-click [Start], and then click [Computer Management].
Right-click [Start], and then click [Computer Management].
For Windows 7, click [Control Panel] on the [Start] menu, and then click [System Security]
[Administrative Tool]. If you cannot find [System Security], click [Administrative Tool].
![]() Click [Services and Applications], and double-click [Services].
Click [Services and Applications], and double-click [Services].
For Windows 7, click [Service].
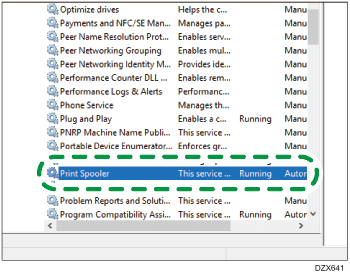
![]() On the "Services" or "Service (Local)" screen, double-click [Print Spooler].
On the "Services" or "Service (Local)" screen, double-click [Print Spooler].
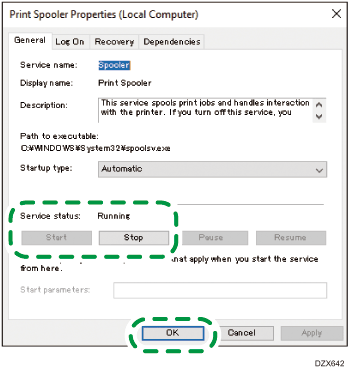
![]() Click [Stop], confirm that "Service status" has changed to "Stopped", and then click [OK].
Click [Stop], confirm that "Service status" has changed to "Stopped", and then click [OK].
Keep the "Service" or "Service (Local)" screen opened and proceed to the next step.
![]() While holding down the [Windows] key on the keyboard, press the [R] key.
While holding down the [Windows] key on the keyboard, press the [R] key.
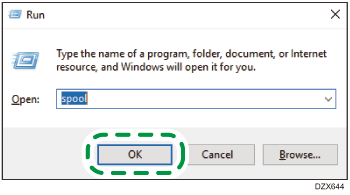
![]() On the "Run" screen, enter [spool], and then click [OK].
On the "Run" screen, enter [spool], and then click [OK].
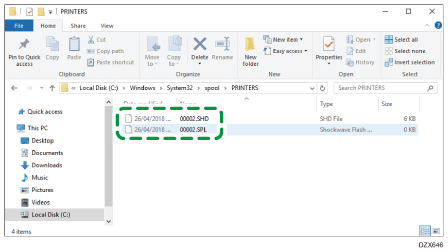
![]() Double-click the [PRINTERS] folder.
Double-click the [PRINTERS] folder.
If "You don't currently have permission to access this folder." is displayed, click [Continue].
![]() Delete all files.
Delete all files.
![]() Close the [PRINTERS] folder screen.
Close the [PRINTERS] folder screen.
![]() Return to the "Service" or "Service (Local)" screen, and then double-click [Print Spooler].
Return to the "Service" or "Service (Local)" screen, and then double-click [Print Spooler].
![]() Click [Start], confirm that "Service status" has changed to "Running", and then click [OK].
Click [Start], confirm that "Service status" has changed to "Running", and then click [OK].
![]() Close the all opened screens.
Close the all opened screens.