Installing the Printer Driver from the Downloaded File
![]() Double-click the downloaded file.
Double-click the downloaded file.
![]() Confirm the location to install the driver, and then click [Install].
Confirm the location to install the driver, and then click [Install].
If the "Security Warning" screen is displayed, click [OK].
If the "User Account Control" screen is displayed, click [Yes] or [Allow].
![]() On the "End User License Agreement" screen, select [Agree], and then click [Next].
On the "End User License Agreement" screen, select [Agree], and then click [Next].
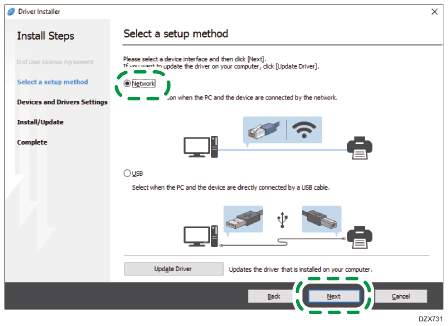
![]() Select [Network], and then click [Next].
Select [Network], and then click [Next].
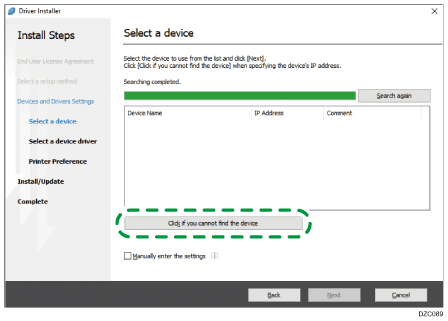
![]() Click [Click if you cannot find the device].
Click [Click if you cannot find the device].
If the "Network Connection Error" screen is displayed, press [OK].
![]() Select [Specify device name], and then click [Next].
Select [Specify device name], and then click [Next].
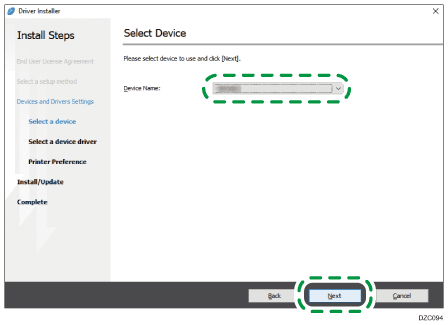
![]() Select the machine to use, and then click [Next].
Select the machine to use, and then click [Next].
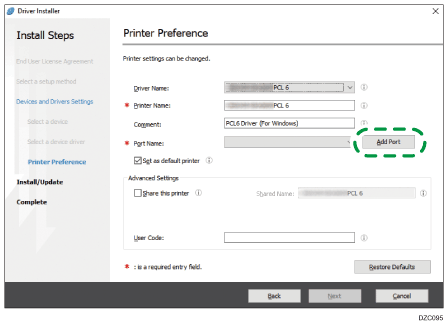
![]() On the "Printer Preference" screen, click [Add Port].
On the "Printer Preference" screen, click [Add Port].
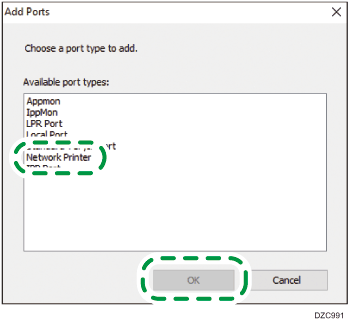
![]() Select [Network Printer], and then click [OK].
Select [Network Printer], and then click [OK].
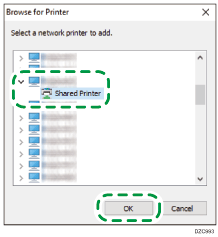
![]() Select the network printer, and then click [OK].
Select the network printer, and then click [OK].
![]() Confirm that the path to the printer to use is displayed in Port Name on the "Printer Preference" screen.
Confirm that the path to the printer to use is displayed in Port Name on the "Printer Preference" screen.
![]() Configure the settings under "Advanced Settings" as necessary, and then click [Next].
Configure the settings under "Advanced Settings" as necessary, and then click [Next].
Printer driver installation starts.
For the PCL 6 driver, proceed to Step 14.
Consult your administrator whether the advanced settings are necessary.
![]() Click [Open Printer Properties].
Click [Open Printer Properties].
![]() On the [Accessories] tab, confirm that the Options installed on the machine are selected, and then click [OK]
On the [Accessories] tab, confirm that the Options installed on the machine are selected, and then click [OK] [Next].
![]() When installation is complete, click [Exit].
When installation is complete, click [Exit].
