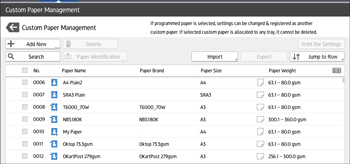
You can open and modify the settings of a registered custom paper and register them as a new custom paper.
This function is useful when registering paper that is the same type as an existing paper, but a different size.
Depending on which settings you modify, details of a newly registered custom paper will be as follows:
When the settings of the selected custom paper are not changed:
All settings of the selected custom paper ([Paper Name], [Paper Size], [Paper Weight], and [Paper Type], including the attributes specific to the printer controller) are copied to the newly registered custom paper.
When the settings [Paper Name], [Paper Size], [Paper Thickness], [Apply Duplex], [Apply Auto Paper Select], or [Advanced Settings] of the selected custom paper are changed:
The changes are applied to the newly registered custom paper.
When the settings [Paper Weight], [Paper Type], [Coated Paper Type], [Paper Color], [Prepunched], or [Textured] of the selected custom paper are changed:
The changes are applied to the newly registered custom paper and its advanced settings are reset to their default values according to the changes that are applied to the settings.
When modifying a custom paper that is registered from the master library, you can change its [Paper Name], [Paper Size], [Apply Duplex], and [Apply Auto Paper Select] settings. You can also confirm the brand name and the version of data from [Paper Brand].
![]() Press [Tray Paper Settings] in the upper left corner of the screen.
Press [Tray Paper Settings] in the upper left corner of the screen.
![]() Press [CustomPaper Management].
Press [CustomPaper Management].
![]() Select a type of custom paper to refer to.
Select a type of custom paper to refer to.

![]() Press
Press ![]() .
.
![]() Change the settings for custom paper (such as paper's name, size, and type), as necessary.
Change the settings for custom paper (such as paper's name, size, and type), as necessary.
![]() Press [Save Paper].
Press [Save Paper].
If you change the [Paper Weight], [Paper Type], [Coated Paper Type], [Paper Color], [Prepunched], or [Textured] and press [Save Paper], a message appears to notify you that the [Advanced Settings] will be initialized. To apply the changes for those settings, select [Change]. To cancel the changes, select [Do not Change].
![]() Press [Add New].
Press [Add New].
![]() Select a number that is labeled as "Not Programmed".
Select a number that is labeled as "Not Programmed".
![]()
Custom paper overwrites the existing item if you select the existing custom paper.
![]() Press [Save].
Press [Save].
![]() Press [Program].
Press [Program].
![]() Press [Exit].
Press [Exit].
![]() Press
Press ![]() .
.
![]() Press the [Home] (
Press the [Home] (![]() ) icon at the center bottom of the screen.
) icon at the center bottom of the screen.
![]()
For details about custom paper settings, see Custom Paper Settings.
For details about [Advanced Settings], contact your machine administrator.
