Advanced Reduce/Enlarge Copying
This section describes the advanced functions for reducing or enlarging images.
For details about the basic reduce/enlarge copy functions, see Reducing or Enlarging Originals.

When using a wide format printer, you can use Fine Magnification function. For details, see the following section:
Use this function to calculate a reproduction ratio based on the lengths of the original and copy.
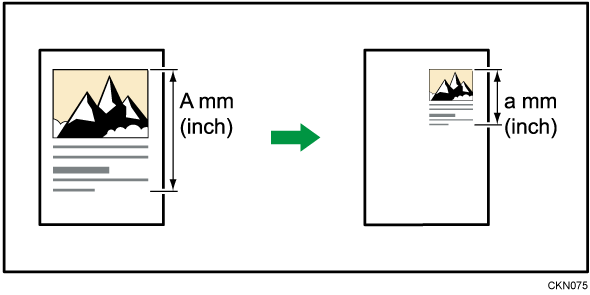
Specify the lengths of the original and copy. The machine selects an enlargement or reduction ratio so that manual calculation is not required.
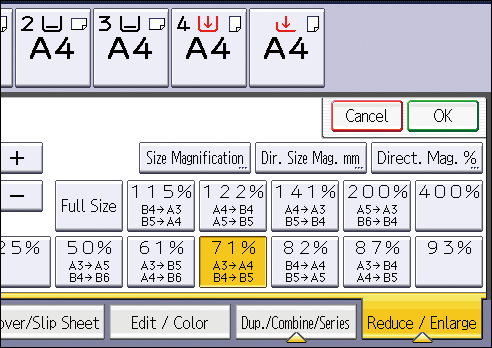
Press [Reduce / Enlarge].

Press [Size Magnification].
Enter the length of the original with the number keys, and then press [
 ].
].
Enter the length of the copy with the number keys, and then press [
].Press [OK] twice.
You can enter sizes between 1 to 999 mm (0.1 to 99.9 inches) in increments of 1 mm (0.1 inches).
The reproduction ratio is between 25 and 400%.
If the calculated reproduction ratio falls below the minimum reproduction ratio, the calculated reproduction ratio will be adjusted to the minimum ratio. If the reproduction ratio is over the maximum reproduction ratio, it will be adjusted to the maximum ratio. If this happens, with some ratios, parts of the image might not be copied or margins will appear on copies.
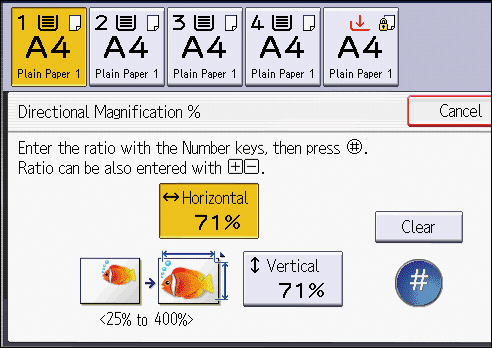
Specify the horizontal and vertical reproduction ratios, individually.
Copies can be reduced or enlarged at different reproduction ratios horizontally and vertically.

![]() : Horizontal
: Horizontal
![]() : Vertical
: Vertical
To specify a reproduction ratio, enter the ratio using the number keys or specify the ratio with [![]() ] or [
] or [![]() ].
].
This section describes how to enter the ratio using the number keys.
Press [Reduce / Enlarge].
Press [Dir. Size Mag. mm] or [Dir. Size Mag. inch].
Press [Horizontal].
Enter the desired ratio with the number keys, and then press [
].
When specifying the ratio with [ ] or [
 ], press [Direct. Mag. %], and then press [[][] keys]. Pressing [] or [] after selecting [Horizontal] or [Vertical] changes the ratio in increments of 1%. Pressing and holding down [] or [] changes it in increments of 10%.
Press [Vertical].
Enter the desired ratio with the number keys, and then press [
].Press [OK] twice.
The reproduction ratio is between 25 and 400%.
You can enter sizes between 1 and 999 mm in increments of 1 mm in metric units, and sizes between 0.1 and 99.9 inches in increments of 0.1 inches in imperial units.
You can select the ratio with priority when [Reduce / Enlarge] is pressed. For details, see User Guide of your device.
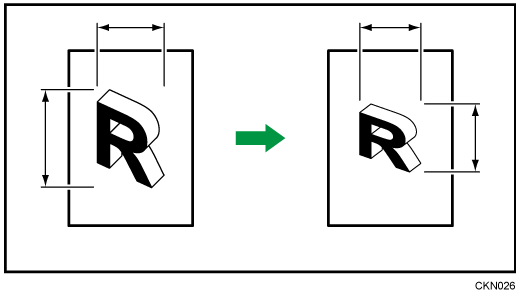
Specify the horizontal and vertical lengths of the original and copy image.
Copies can be reduced or enlarged at different reproduction ratios horizontally and vertically.
![]() : Horizontal length
: Horizontal length
![]() : Vertical length
: Vertical length
Specify length and width of the originals and the copies.
Press [Reduce / Enlarge].
Press [Dir. Size Mag. mm] or [Dir. Size Mag. inch].
Enter the horizontal size of the original with the number keys, and then press [
].
Enter the horizontal size of the copy with the number keys, and then press [
].Enter the vertical size of the original with the number keys, and then press [
].Enter the vertical size of the copy with the number keys, and then press [
].Press [OK] twice.
The reproduction ratio is between 25 and 400%.
You can enter sizes between 1 and 999 mm in increments of 1 mm in metric units, and sizes between 0.1 and 99.9 inches in increments of 0.1 inches in imperial units.
If the calculated reproduction ratio falls below the minimum reproduction ratio, the calculated reproduction ratio will be adjusted to the minimum ratio. If the reproduction ratio is over the maximum reproduction ratio, it will be adjusted to the maximum ratio. If this happens, with some ratios, parts of the image might not be copied or margins will appear on copies.
Reduces the image to 93% of its original size and places the reduced image at the center. By combining it with the Reduce / Enlarge functions, you can further increase a margin.
Press [Original Settng].

Press [Original Size].
Specify the original size, and then press [OK].
Press [Original Orientation].
Select original orientation.

Press [OK].
Press [Create Margin].
Select the reproduction ratio, if necessary.
Select the paper tray.
Place the originals, and then press [Start].
You can change the ratio for Create Margin in the following settings. For details, see User Guide of your device.
Settings screen type: Standard
[Copier / Document Server Settings] [Reduce / Enlarge] [Ratio for Create Margin]
Settings screen type: Classic
[Copier / Document Server Settings] [Reproduction Ratio] [Ratio for Create Margin]