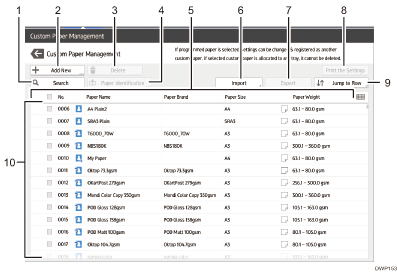
This section explains the items on the [Custom Paper Management] screen.
This screen appears when you press [CustomPaper Management] on the [Tray Paper Settings] screen.

[Search]
Press [Search] to search for papers in the list of custom papers. Press [Search] again to return to the list of custom papers from the search result. For details, see Searching for a Paper by Specifying the Conditions.
[Add New]
Press this key to register a new type of custom paper. For details, see Registering a Custom Paper.
[Delete]
Press this key to delete the selected custom paper from the list. For details, see Deleting a Custom Paper.
[Paper Identification]
Scans the paper using the Media Identification Unit, and searches for a type of paper with the closest settings from the registered custom paper.
For details, see Registering a Custom Paper with the Media Identification Unit.
Item name
Displays an item name in the custom paper list. The items to be displayed can be selected from the following:
[No.] (fixed item)
[Paper Name] (fixed item)
[Paper Brand] (initial display)
[Paper Size] (initial display)
[Paper Weight] (initial display)
[Manufacturer]
[Paper Thickness]
[Paper Type]
[Paper Color]
[Coated Paper Type]
[Prepunched]
[Textured]

You can specify whether or not to display each item except [No.] and [Paper Name].
You can sort the custom paper list by pressing each item name.
To select an item to display on the custom paper list, press the list icon (
 ) to display the [Select Item Displayed/Arrange Order] screen, and then select the item by selecting the check box. You can also change the display order by dragging the item on the screen.
[Import]
Press this key to import custom paper from the Master Library or SD card. For details, see Selecting paper to import from the Master Library or SD Card.
[Export]
Press this key to export all types of custom paper to an SD card.
For details, see Exporting Custom Paper to an SD Card.
[Print the Settings]
Press this key to print the parameters of the custom paper settings. For details, see Printing the Parameters of Custom Paper Settings.
[Jump to Row]
Press this key to scroll down the list of custom paper to the specified line. You can specify the number in increments of 100.
List of custom papers
The list of registered custom papers is displayed.
A custom paper that is assigned to a paper tray is indicated by the icon
 , and a custom paper that is assigned to more than one trays is indicated by the icon
  .
.Also, one of the following icons is displayed next to [No.]:
 : A custom paper that is created as new
 : A custom paper that is registered from the Master Library
 : A custom paper that is registered from the Master Library and then modified
