According to the type of image to be printed, perform the procedure in "(a) If printing an original including both solid-fill and half-tone parts on the same page" or "(b) If printing an original that has solid-fill images at the trailing edge of a page and half-tone images at the leading edge of the next page".
(a) If printing an original including both solid-fill and half-tone parts on the same page
![]() Can you rotate the original by 90 or 180 degrees?
Can you rotate the original by 90 or 180 degrees?

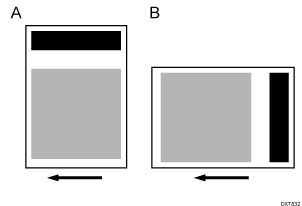
A: Rotation by 90 degrees
B: Rotation by 180 degrees
Yes |
Rotate the original by 90 or 180 degrees. |
No |
Proceed to Step 3. |
![]() Print the image. Has the problem been resolved?
Print the image. Has the problem been resolved?
Yes |
Finished! |
No |
Go to the next step. |
![]() In [Advanced Settings] for the custom paper you are using, select 1231: [Print Speed], and then set the value in the following corresponding settings to [Middle].
In [Advanced Settings] for the custom paper you are using, select 1231: [Print Speed], and then set the value in the following corresponding settings to [Middle].
[BW/FC/FCS]
[BW/FC/FCS]
[FCS]
[Clear/Special], [White]
[S]
[Clear/Special], [White]
[BW/FC/FCS: Fuser Setting HQ]
[BW/FC/FCS]
[FCS: Fuser Setting HQ]
[Clear/Special], [White]
[S: Fuser Setting HQ]
[Clear/Special], [White]
![]() Print the image. Has the problem been resolved?
Print the image. Has the problem been resolved?
Yes |
Finished! |
No |
Go to the next step. |
![]() Select 1231: [Print Speed], and then set the value in the following corresponding settings to [Low].
Select 1231: [Print Speed], and then set the value in the following corresponding settings to [Low].
[BW/FC/FCS]
[BW/FC/FCS]
[FCS]
[Clear/Special], [White]
[S]
[Clear/Special], [White]
[BW/FC/FCS: Fuser Setting HQ]
[BW/FC/FCS]
[FCS: Fuser Setting HQ]
[Clear/Special], [White]
[S: Fuser Setting HQ]
[Clear/Special], [White]
![]() Print the image. Has the problem been resolved?
Print the image. Has the problem been resolved?
Yes |
Finished! |
No |
Contact your service representative. |
(b) If printing an original that has solid-fill images at the trailing edge of a page and half-tone images at the leading edge of the next page
![]() Can you rotate the original by 90 or 180 degrees?
Can you rotate the original by 90 or 180 degrees?

A: Rotation by 90 degrees
B: Rotation by 180 degrees
Yes |
Rotate the original by 90 or 180 degrees. |
No |
Proceed to Step 3. |
![]() Print the image. Has the problem been resolved?
Print the image. Has the problem been resolved?
Yes |
Finished! |
No |
Go to the next step. |
![]() In [Advanced Settings] for the custom paper you are using, select 1237: [Print Speed (Sheet Interval Adj)], and then adjust the value in the following corresponding settings.
In [Advanced Settings] for the custom paper you are using, select 1237: [Print Speed (Sheet Interval Adj)], and then adjust the value in the following corresponding settings.
Increase the gap between the pages to move the location of the jitters away from the half-tone part.
Increase the value by 1% to move the image toward the leading edge of the paper by approximately 5 mm.
[BW/FC/FCS]
[BW/FC/FCS]
[FCS/S]
[Clear/Special], [White]
![]() Print the image. Has the problem been resolved?
Print the image. Has the problem been resolved?
Yes |
Finished! |
No |
Contact your service representative. |
