Jobs printed using copier, Document Server, or printer mode are temporarily stored in the machine, and then executed in order. You can manage these jobs on the [Check Status] screen or the [Job List] screen.
For example, you can cancel incorrect job settings or print an urgent document.
You cannot use the Job List function when Interrupt Copy is active.
Documents printed using the scanner function are not displayed in the job list.
This section explains displays and icons that appear on the [Check Status] screen and the [Job List] screen.
The screens vary depending on whether [Job Order] is selected with [Interleave Priority] for the [System Settings]. For details about the setting, see "System Settings", Device Management.
[Check Status] screen
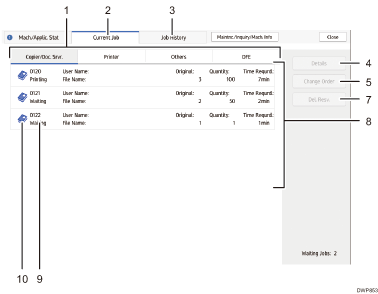
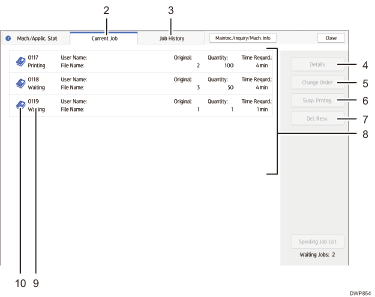
To display this screen, press the [Check Status] key, and then press the [Current Job] tab. The jobs continue when this screen is open.
When [Job Order] is not selected:
The job list is displayed for each of the functions.

When [Job Order] is selected:
The job list is displayed for all functions in the order of print jobs.

[Copier/Doc. Srvr.], [Printer], and [Others]
Switches between job lists for each function.

When a color controller is connected, its name is also displayed.
[Current Job] tab
Displays current and waiting jobs.
[Job History] tab
Displays the history. You can check the contents of completed print jobs.
[Details]
Press to display the contents of the job you select.
[Change Order]
Press to change the order of jobs.
[Susp. Prntng.]
Press to hold jobs you select.
[Del. Resv.]
Press to cancel jobs you select.
Job list
Displays the job list. If the job you want to select is not displayed in the list, press [
 Previous] or [
 Next] to scroll the screen.
Job number
Displays reserved job numbers.
Icons of the functions used to print jobs
 : Job printed using copy function
 : Job printed using printer function
 : Job printed using Document Server function
 : Job printed using Web Image Monitor
[Job List] screen
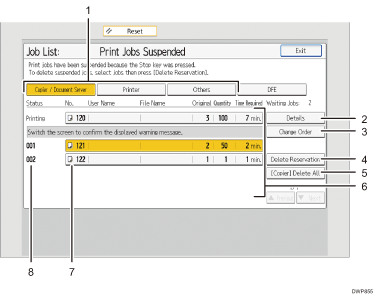
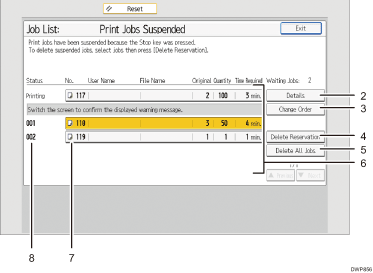
To display this screen, press the [Stop] key, and then press [Job List]. The jobs stop when this screen is open.
When [Job Order] is not selected:
The job list is displayed for each of the functions.

When [Job Order] is selected:
The job list is displayed for all functions in the order of print jobs.

[Copier / Document Server], [Printer], and [Others]
Switches between job lists for each function.

When a color controller is connected, its name is also displayed.
[Details]
Press to display the contents of the job you select.
[Change Order]
Press to change the order of jobs.
[Delete Reservation]
Press to cancel jobs you select.
[Delete All Jobs]
Press to cancel all jobs.
Job list
Displays the job list. If the job you want to select is not displayed in the list, press [
 Previous] or [
 Next] to scroll the screen.
Icons of the functions used to print jobs
 : Job printed using copy function
 : Job printed using printer function
 : Job printed using Document Server function
 : Job printed using Web Image Monitor
Job number
Displays reserved job numbers.
![]()
When the user authentication is enabled, only logging in user's jobs are displayed.
