This section explains how to perfect bind originals scanned from the ADF. You can specify the binding position, cut position, and the finishing size.
Guide to perfect bound booklets
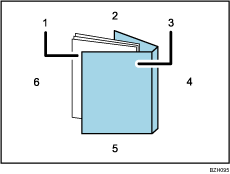
Book block
The bulk of the booklet, enclosed by the cover sheet.
Head edge
The edge that forms the booklet's top end.
Cover
The sheet enclosing the book block.
Spine
The booklet's bound edge.
Tail edge
The edge that forms the bottom end of the booklet.
Fore edge
The edge that forms the booklet's opening side.
The length/size of a cover sheet depends on the thickness of the book block's spine. For details about how to calculate approximate spine thickness and cover sheet length/size, see "Loading Cover Sheets into the Interposer of the Perfect Binder", Preparation.
![]() Place the originals for the book block in the ADF.
Place the originals for the book block in the ADF.
![]() Load cover sheets into the interposer of the perfect binder.
Load cover sheets into the interposer of the perfect binder.
For details, see "Loading Cover Sheets into the Interposer of the Perfect Binder", Preparation.
![]() Select the paper tray for the book block sheets.
Select the paper tray for the book block sheets.
![]() Press [Output/ Customize Function/ Finisher].
Press [Output/ Customize Function/ Finisher].
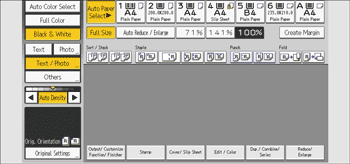
![]() Press [Perfect Binding].
Press [Perfect Binding].
![]() Select one of the binding positions.
Select one of the binding positions.
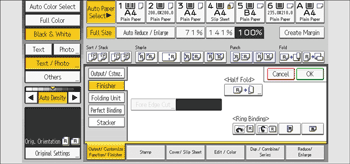
When you select perfect binding position, Sort is automatically selected.
![]() Specify a binding position and a cut size if necessary.
Specify a binding position and a cut size if necessary.
![]() After making all settings, press [OK].
After making all settings, press [OK].
![]() Press the [Start] key.
Press the [Start] key.
Glue heating begins.
When the glue is hot enough, binding starts.
![]() Press the delivery key when the status indicator goes off and the delivery key indicator lights up.
Press the delivery key when the status indicator goes off and the delivery key indicator lights up.
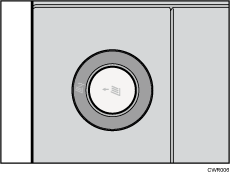
![]() Remove bound booklets and close the lower left tray.
Remove bound booklets and close the lower left tray.
![]()
For details about paper sizes, weights, and the number of sheets that can be used, and the volume that can be output to the perfect binder tray, see "Specifications for Perfect Binder", Specifications.
Specifying the fore edge cut
Use the following procedure to specify the fore edge cut when perfect binding is applied.
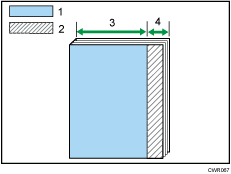
Finishing size
Cut size
139.7–216.0 mm (5.50–8.50 inches)
6.0–50.0 mm (0.24–1.96 inches)
There are two ways of specifying the fore edge:
Specify Cut Size
Specify the distance of the cut from the fore edge.
Specify Finishing Size
Specify the size of the finished bound booklets to determine the position where you want to cut the fore edge.
![]()
When specifying the fore edge cut, be sure that the cut is at least 6 mm (0.24 inches) from the fore edge.
Specifying the distance of the cut from the fore edge
Specify the distance of the cut from the fore edge.
![]() Press [Cut Fore Edge].
Press [Cut Fore Edge].
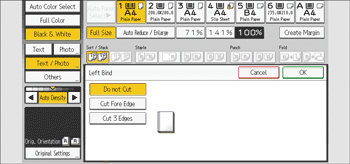
![]() Make sure that [Specify Cut Size] is selected.
Make sure that [Specify Cut Size] is selected.
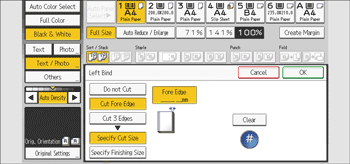
![]() Enter the cut length using the number keys, and then press [
Enter the cut length using the number keys, and then press [![]() ].
].
![]()
You can adjust the position of the fore edge cut from 6.0 to 50.0 mm (0.24 to 1.96 inches) in 0.1 mm (0.01 inches) increments.
Specifying the finishing size
Specify the size of the finished bound booklets to determine the position where you want to cut the fore edge.
![]() Press [Cut Fore Edge].
Press [Cut Fore Edge].

![]() Press [Specify Finishing Size].
Press [Specify Finishing Size].
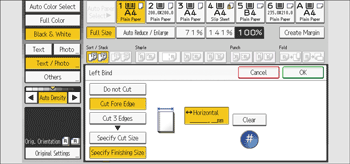
![]() Enter the required finishing size using the number keys, and then press [
Enter the required finishing size using the number keys, and then press [![]() ].
].
![]()
You can adjust the finishing size from 139.7 to 216.0 mm (5.50 to 8.50 inches) in 0.1 mm (0.01 inches) increments.
Specifying the three edge cut
Use the following procedure to specify the three edge cut when perfect binding is applied.
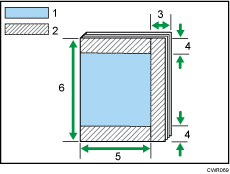
Finishing size
Cut size
6.0–50.0 mm (0.24–1.96 inches)
6.0–28.0 mm (0.24–1.10 inches)
139.7–216.0 mm (5.50–8.50 inches)
201.0–297.0 mm (7.92–11.69 inches)
There are three ways of specifying the size of a booklet by cutting the edges:
Specify Cut Size
Specify the distance of the cut from each edge.
Specify Finishing Size (regular size)
Specify the size of the finished bound booklets and cut three edges to a regular size.
Specify Finishing Size (custom size)
Specify the size of the finished bound booklets and cut three edges to a custom size.
Specifying the distance of the cut from each edge
Specify the distance of the cut from each edge.
![]() Press [Cut 3 Edges].
Press [Cut 3 Edges].

![]() Make sure that [Specify Cut Size] is selected.
Make sure that [Specify Cut Size] is selected.
![]() Enter the position of the cut for each edge using the number keys, and then press [
Enter the position of the cut for each edge using the number keys, and then press [![]() ].
].
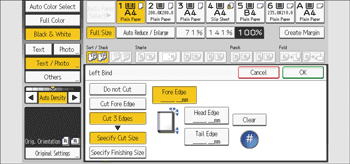
Press [Head Edge], and then enter the cut position for the head edge using the number keys.
Press [Tail Edge], and then enter the cut position for the tail edge using the number keys.
![]()
You can adjust the position of the fore edge cut from 6.0 to 50.0 mm (0.24 to 1.96 inches) in 0.1 mm (0.01 inches) increments.
You can shift the position of the head and tail edge cuts from 6.0 to 28.0 mm (0.24 to 1.10 inches) in 0.1 mm (0.01 inches) increments.
Finishing to a regular size
Specify the size of the finished bound booklets and cut three edges to a regular size.
Book block paper and cover sheet compatibility
If you specify finishing to a regular size, you can select one of the following sizes: A4![]() , B5 JIS
, B5 JIS![]() , A5
, A5![]() , 81/2 × 11
, 81/2 × 11![]() , 51/2 × 81/2
, 51/2 × 81/2![]()
We recommend that you use the cover sheet size with the book block paper sizes as shown in the following table.
Required finished size |
Book block |
Cover |
|---|---|---|
A4 |
SRA4 226 × 310 mm*1 |
13 × 191/5 13 × 19 13 × 18 SRA3 12 × 18 123/5 × 191/5 123/5 × 181/2 |
B5 JIS |
A4 81/2 × 11 16K |
A3 11 × 17 11 × 15 8K |
A5 |
B5 JIS |
B4 JIS 11 × 15 |
81/2 × 11 |
9 × 12*1 |
13 × 191/5 13 × 19 12 × 18 123/5 × 191/5 123/5 × 181/2 |
51/2 × 81/2 |
71/4 × 101/2 |
10.5 × 14.5*1 |
*1 Specify the custom size in [Tray Paper Settings].
![]() Press [Cut 3 Edges].
Press [Cut 3 Edges].

![]() Press [Specify Finishing Size].
Press [Specify Finishing Size].
![]() Select the finished size under [Regular Size].
Select the finished size under [Regular Size].
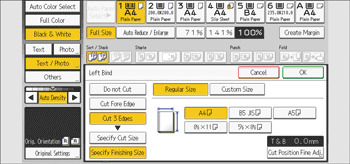
![]() To adjust the cut position, press [Cut Position Fine Adj.].
To adjust the cut position, press [Cut Position Fine Adj.].
![]() Press [
Press [![]() ] and [
] and [![]() ] to set the top or bottom cut position, and then press [OK].
] to set the top or bottom cut position, and then press [OK].
![]()
You can shift the cut position from -22.0 to 22.0 mm (-0.86 to 0.86 inches) in 0.1 mm (0.01 inches) increments.
Finishing to a custom size
Specify the size of the finished bound booklets and cut three edges to a custom size.
![]() Press [Cut 3 Edges].
Press [Cut 3 Edges].

![]() Press [Specify Finishing Size].
Press [Specify Finishing Size].
![]() Press [Custom Size].
Press [Custom Size].
![]() Enter the horizontal size with the number keys, and then press [
Enter the horizontal size with the number keys, and then press [![]() ].
].
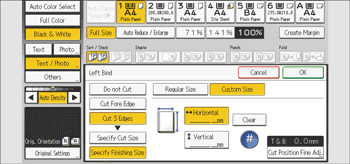
![]() Enter the vertical size with the number keys, and then press [
Enter the vertical size with the number keys, and then press [![]() ].
].
![]() To adjust the cut position, press [Cut Position Fine Adj.].
To adjust the cut position, press [Cut Position Fine Adj.].
![]() Press [
Press [![]() ] and [
] and [![]() ] to set the top or bottom cut position, and then press [OK].
] to set the top or bottom cut position, and then press [OK].
![]()
You can shift the horizontal cut position from 139.7 to 216.0 mm (5.50 to 8.50 inches) in 0.1 mm (0.01 inches) increments.
You can shift the vertical cut position from 201.0 to 297.0 mm (7.92 to 11.69 inches) in 0.1 mm (0.01 inches) increments.
You can shift the cut position from -22.0 to 22.0 mm (-0.86 to 0.86 inches) in 0.1 mm (0.01 inches) increments.
