![]() Press [Home] (
Press [Home] (![]() ) at the bottom of the screen in the center.
) at the bottom of the screen in the center.
![]() Flick the screen to the left, and then press the [User Tools] icon (
Flick the screen to the left, and then press the [User Tools] icon (![]() ).
).
![]() Press [Tray Paper Settings].
Press [Tray Paper Settings].
![]() Press [
Press [![]() ] repeatedly until [Printer Bypass Paper Size] appears.
] repeatedly until [Printer Bypass Paper Size] appears.
![]() Press [Printer Bypass Paper Size].
Press [Printer Bypass Paper Size].
![]() Press [Custom Size].
Press [Custom Size].
If a custom size is already specified, press [Change].
![]() Press [Horizontal].
Press [Horizontal].
![]() Enter the horizontal size using the number keys, and then press [
Enter the horizontal size using the number keys, and then press [![]() ].
].
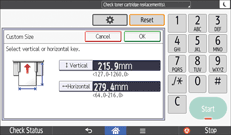
![]() Press [Vertical].
Press [Vertical].
![]() Enter the vertical size using the number keys, and then press [
Enter the vertical size using the number keys, and then press [![]() ].
].
![]() Press [OK] twice.
Press [OK] twice.
![]() Press [User Tools] (
Press [User Tools] (![]() ).
).
![]() Press [Home] (
Press [Home] (![]() ) at the bottom of the screen in the center.
) at the bottom of the screen in the center.