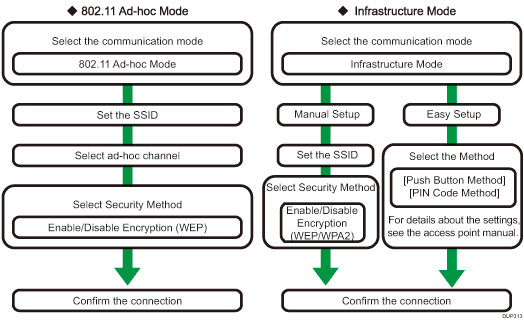
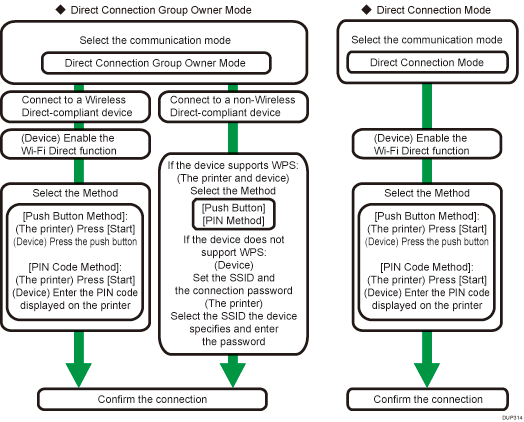
This section explains how to setup a wireless LAN interface.
To configure the wireless LAN settings manually, display the screen for Wireless LAN configuration, and then use the following procedure:


![]()
When [802.11 Ad-hoc Mode] is selected in Communication Mode, select the channel for [Ad-hoc Channel]. Set a channel that matches the type of wireless LAN being used. For details about setting the Ad-hoc Channel, see Wireless LAN Configuration.
For details about security method settings, see "Configuring IEEE 802.1X Authentication", Security Guide.
Select either [WEP] or [WPA2] as the security method. If you select [WPA2], it is necessary to set the communication mode to [Infrastructure Mode].
In [WPA2], select either [WPA2] or [WPA2-PSK] as the security method.
If you select [WPA2-PSK], enter the pre-shared key (PSK). If you select [WPA2], it is necessary to select the encryption method and install the device certificate. For details about configuring the settings, see the Security Guide.
To connect to multiple Wi-Fi Direct-compliant devices by using the printer as a simple access point, use the Direct Connection: Group Owner mode. Up to five devices can be connected. Non-Wi-Fi Direct-compliant devices can be connected too.
In Direct Connection: Group Owner mode, the devices connected to the printer cannot communicate with each other. The devices can only communicate with the printer.
In Direct Connection: Group Owner mode, the printer can communicate by Ethernet and wireless LAN simultaneously.
Use Direct Connection mode to connect the printer to another device one-on-one through the Wi-Fi Direct function. If this mode is enabled, the printer cannot connect to non-Wi-Fi Direct-compliant devices.
For details about settings other than those configured from the control panel, see List of setting items.
You can print the configuration page to check the settings. For details about printing the configuration page, see Test Printing.
