The solution depends on the interval at which the colored spots appear. If they appear every 189 mm (7.5 inches), follow Procedure (a) on the following page; if they appear every 40 mm (1.6 inches), Procedure (b) on the following page.
(a) Colored spots at 189 mm (7.5 inches) intervals
![]() To identify the affected color, print three full-page, solid-fill A3 or DLT sheets for each of white and black, and three full-page, halftone A3 or DLT sheets for each of cyan, magenta, and yellow.
To identify the affected color, print three full-page, solid-fill A3 or DLT sheets for each of white and black, and three full-page, halftone A3 or DLT sheets for each of cyan, magenta, and yellow.
![]() Detach the photoconductor unit of the affected color and check the drum surface. Is the surface scratched?
Detach the photoconductor unit of the affected color and check the drum surface. Is the surface scratched?
Yes |
Replace the drum. |
No |
Contact your service representative. |
![]() If the problem persists, contact your service representative.
If the problem persists, contact your service representative.
![]()
For details about replacing the drum, see Replacement Guide.
(b) Colored spots at 40 mm (1.6 inches) intervals
![]() In the [Machine: Maintenance] group on the [Adjustment Settings for Skilled Operators] menu, execute [Execute Charge Roller Cleaning].
In the [Machine: Maintenance] group on the [Adjustment Settings for Skilled Operators] menu, execute [Execute Charge Roller Cleaning].
![]() Print the image. Is the problem resolved?
Print the image. Is the problem resolved?
Yes |
Go to the next step. |
No |
Finished! |
![]() To identify the affected color, print three full-page, solid-fill A3 or DLT sheets for each of white and black, and three full-page, halftone A3 or DLT sheets for each of cyan, magenta, and yellow.
To identify the affected color, print three full-page, solid-fill A3 or DLT sheets for each of white and black, and three full-page, halftone A3 or DLT sheets for each of cyan, magenta, and yellow.
![]() Detach the charge roller of the affected color and check its surface. Is the surface scratched?
Detach the charge roller of the affected color and check its surface. Is the surface scratched?
Yes |
Replace the charge roller. |
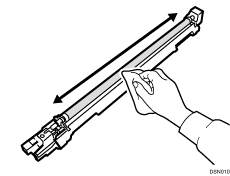
No |
Wipe the charge roller surface with a well-wrung-out damp cloth, wipe it with a dry rag until no moisture remains, and then reattach the roller. |
![]()
Do not use ethanol or any other organic solvent to clean the charge roller. Otherwise it may cause damage to the charge roller.
![]() If the problem persists, contact your service representative.
If the problem persists, contact your service representative.
![]()
For details about replacing the charge roller, see Replacement Guide.