The optional USB device server is an interface board that adds an Ethernet port to the printer.
With this option installed, two Ethernet cables can be connected at the same time using the standard port on the printer and an additional port on the USB device server. You can assign different IP addresses to each port, so the printer can print jobs from different network segments.
Procedure for installing the USB device server
![]() Check the contents of the package.
Check the contents of the package.
![]() Turn the printer off and unplug the power cord.
Turn the printer off and unplug the power cord.
![]() Remove the cover of USB2.0 port on the printer.
Remove the cover of USB2.0 port on the printer.
![]() Loosen the two screws and remove the slot cover.
Loosen the two screws and remove the slot cover.
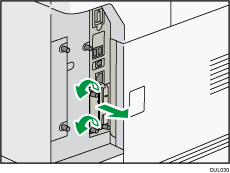
The removed cover will not be reused.
![]() Fully insert the interface board.
Fully insert the interface board.
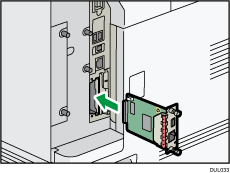
Check that the interface board is firmly connected to the controller board.
![]() Tighten the two screws to secure the interface board.
Tighten the two screws to secure the interface board.
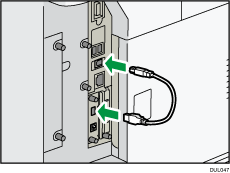
![]() Connect the supplied USB2.0 (Type B) interface cable to the USB2.0 port on the printer and the other end to the extended USB Port of the USB Device Server Option.
Connect the supplied USB2.0 (Type B) interface cable to the USB2.0 port on the printer and the other end to the extended USB Port of the USB Device Server Option.
![]() Plug in the power cord, and then turn on the printer.
Plug in the power cord, and then turn on the printer.
![]() Print the configuration page to confirm that the board was attached correctly.
Print the configuration page to confirm that the board was attached correctly.