No. |
Icon |
Description |
|---|---|---|
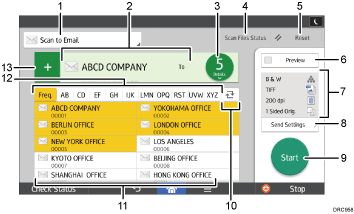
1 |
|
Displays the type of scanner destination. Press to switch between e-mail destinations and folder destinations. |
2 |
|
The specified destination is shown here. By tapping the destination, you can register it to the Address Book or remove it from the destinations. By flicking up and down, you can confirm the selected destinations. |
3 |
|
The total number of the selected destinations appears. Press to display a screen to confirm destinations. In the screen to confirm destinations, you can do the following:
|
4 |
|
Press to display the transmission results screen. In the transmission results screen, you can do the following:
|
5 |
|
Press to clear your current settings. |
6 |
|
Press to display the preview screen after scanning originals. |
7 |
|
You can check the settings in Send Settings. |
8 |
|
Press to open the send settings screen. For details, see [Send Settings] screen. |
9 |
|
Press to scan originals and start sending. |
10 |
|
Press to switch the section of the Address Book. |
11 |
|
Shows the destinations in the Address Book. If a password or protection code is specified to a folder destination, enter the password or protection code on the screen displayed after tapping the folder destination. |
12 |
|
The sections of the Address Book. |
13 |
|
Press to add a destination. Destinations can be added as follows:
|


![]()
If you specify many destinations, the machine might require some time to start scanning originals after [Start] is pressed.