![]() Check the contents of the package.
Check the contents of the package.
![]() Turn the printer off and unplug the power cord.
Turn the printer off and unplug the power cord.
![]() Loosen the two screws and remove the slot cover.
Loosen the two screws and remove the slot cover.
The removed cover will not be reused.
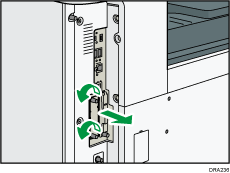
![]() Fully insert the interface board.
Fully insert the interface board.

Check that the interface board is firmly connected to the controller board.
![]() Tighten the two screws to secure the interface board.
Tighten the two screws to secure the interface board.
![]() Plug in the power cord, and then turn on the printer.
Plug in the power cord, and then turn on the printer.
![]() Print the configuration page to confirm that the board was attached correctly.
Print the configuration page to confirm that the board was attached correctly.
![]()
If the board was not installed properly, repeat the procedure from the beginning. If it cannot be installed correctly even after trying the installation a second time, contact your sales or service representative.