The optional USB device server is an interface board that adds an Ethernet port to the printer.
With this option installed, two Ethernet cables can be connected at the same time using the standard port on the printer and an additional port on the USB device server. You can assign different IP addresses to each port, so the printer can print jobs from different network segments.
Procedure for installing the USB device server
![]() Check the contents of the package.
Check the contents of the package.
![]() Turn the printer off and unplug the power cord.
Turn the printer off and unplug the power cord.
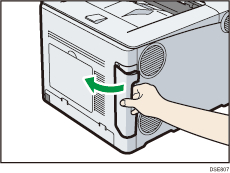
![]() Remove the cable cover.
Remove the cable cover.
![]() Loosen the two screws and remove the slot cover.
Loosen the two screws and remove the slot cover.
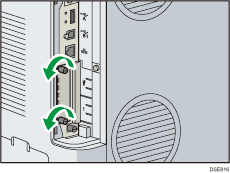
The removed cover and screws will not be reused.
![]() Fully insert the interface board.
Fully insert the interface board.
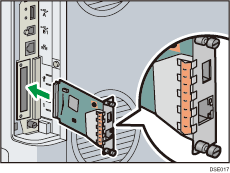
Check that the interface board is firmly connected to the controller board.
![]() Tighten the two screws to secure the interface board.
Tighten the two screws to secure the interface board.
![]() Using the supplied USB cable, connect the printer and USB device server.
Using the supplied USB cable, connect the printer and USB device server.
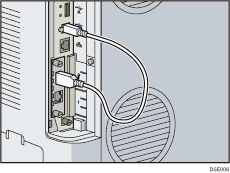
For details, see the setup guide supplied with the USB device server.
Configuring settings
After installing and connecting the USB device server to the printer, configure the printer settings.
![]()
When using the USB device server, set [Engy Sv Md to Dsbl Prt Srv] to [Disable mode] to prevent the printer from entering Energy Saver mode. Otherwise, the USB device server loses communication with the network while the printer is in Energy Saver mode, and the printer cannot receive print jobs.
![]() Press the [User Tools] key, and then display the [Administrator Tools] screen.
Press the [User Tools] key, and then display the [Administrator Tools] screen.
[System Settings] |
![]() Configure the following settings:
Configure the following settings:
[Energy Saver Mode to Disable Print Server] |