You can switch Screens 1 to 4 described in this section by flicking the screen up or down.
1
No. |
Icon |
Description |
|---|---|---|
1 |
|
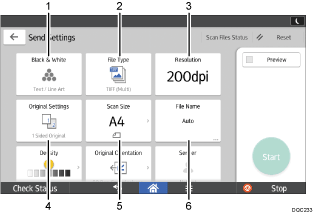
Press to select the settings that are appropriate for the type of your original and the color mode. |
2 |
|
Press to select a file type. |
3 |
|
Press to select the resolution to scan the original. |
4 |
|
Press to select the sides of the original to scan, such as one side or both sides. |
5 |
|
Press to select the scanning size of the original. |
6 |
|
Press to specify a file name. |
2
No. |
Icon |
Description |
|---|---|---|
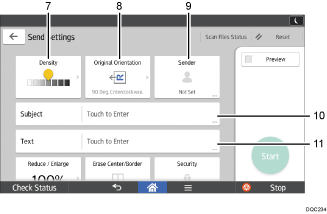
7 |
|
Press to specify the density to scan the original. You can also specify the density by touching the |
8 |
|
Press to select the orientation of the original. |
9 |
|
Press to specify the sender. |
10 |
|
Press to enter the subject of the e-mail. |
11 |
|
Press to enter the main text of the e-mail. |
3
No. |
Icon |
Description |
|---|---|---|
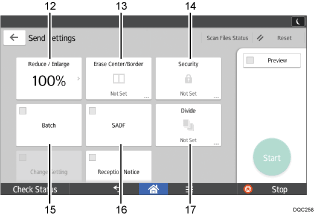
12 |
|
Press to specify the magnification ratio for scanning the original. |
13 |
|
Press to erase the image from a specified width around the document and in the center of the document when the document is scanned. |
14 |
|
Press to sign and encrypt the e-mail. |
15 |
|
Press to scan a large number of originals in several batches and send them together as a single job. You can place multi-page originals in the ADF. |
16 |
|
Press to scan a large number of originals in several batches and send them together as a single job. Place the originals in the ADF one by one. |
17 |
|
Press to divide a multi-page original into parts of a specified number of pages each, and then send the documents. |
4
No. |
Icon |
Description |
|---|---|---|
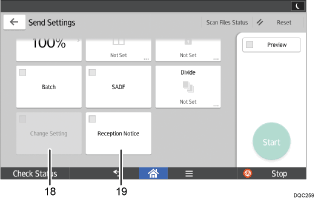
18 |
|
Press to scan multiple originals that consist of one-sided and two-sided originals. You can select this only if [Batch] or [SADF] is also selected. |
19 |
|
Press this to notify the sender that the e-mail recipient has opened the e-mail. |


