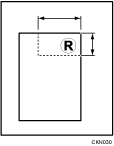
User Stamp is used to register an image that is used as a user stamp. Place the original of the image that you want to register as a user stamp on the exposure glass.
The size range for stamp images is 10–216 mm (0.4–8.5 inches) high and 10–297 mm (0.4–11.7 inches) wide. However, if the stamp's size exceeds the maximum value of the area (5000 mm2, 7.75 inch2), it will be automatically corrected to a size that is within the range of the area.

![]() : Horizontal size
: Horizontal size
![]() : Vertical size
: Vertical size
Up to four frequently used images can be stored in memory.
![]() Press [Home] (
Press [Home] (![]() ) at the bottom of the screen in the center.
) at the bottom of the screen in the center.
![]() Flick the screen to the left, and then press the [User Tools] icon (
Flick the screen to the left, and then press the [User Tools] icon (![]() ).
).
![]() Press [Machine Features].
Press [Machine Features].
![]() Press [Copier / Document Server Features].
Press [Copier / Document Server Features].
![]() Press [Stamp].
Press [Stamp].
![]() Press [User Stamp].
Press [User Stamp].
![]() Press [Program / Delete Stamp].
Press [Program / Delete Stamp].
![]() Press the stamp number you want to program.
Press the stamp number you want to program.
![]() Enter the user stamp name (up to 10 characters) with the letter keys, and then press [OK].
Enter the user stamp name (up to 10 characters) with the letter keys, and then press [OK].
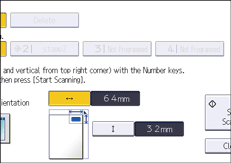
![]() Enter the horizontal size of the stamp with the number keys, and then press [
Enter the horizontal size of the stamp with the number keys, and then press [![]() ].
].

![]() Press
Press ![]() (Vertical).
(Vertical).
![]() Enter the vertical size of the stamp with the number keys, and then press [
Enter the vertical size of the stamp with the number keys, and then press [![]() ].
].
![]() Place the original for user stamp on the exposure glass, and then press [Start Scanning].
Place the original for user stamp on the exposure glass, and then press [Start Scanning].
![]() Press [User Tools] (
Press [User Tools] (![]() ) on the top right of the screen.
) on the top right of the screen.
![]() Press [Home] (
Press [Home] (![]() ) at the bottom of the screen in the center.
) at the bottom of the screen in the center.
![]()
If the stamp number is already being used, the machine will ask you if you want to overwrite it. Press [Yes] or [Stop].
You cannot restore the overwritten stamp.
Stamp numbers with
 already have settings in them. Stamp numbers that are not registered yet are marked with "Not Programmed".
For details about how to enter text, see "Entering Text", Getting Started.
