This section explains how to connect an Ethernet interface cable to the USB device server.
The network interface cable connected to the USB device server must use a ferrite core to prevent RF interference.
![]()
Be sure to turn off the power switch of the printer before connecting or disconnecting the Ethernet interface cable.
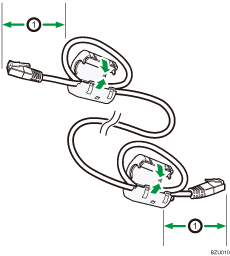
![]() Make a loop at a distance of 3 cm (1.2 inches) (1) from each end of the Ethernet interface cable, and then attach to each loop the ferrite core provided with the USB device server.
Make a loop at a distance of 3 cm (1.2 inches) (1) from each end of the Ethernet interface cable, and then attach to each loop the ferrite core provided with the USB device server.

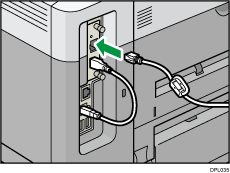
![]() Connect one end of the Ethernet interface cable to the Ethernet port of the USB device server.
Connect one end of the Ethernet interface cable to the Ethernet port of the USB device server.

You can use either a straight or crossover Ethernet cable for connecting to the USB device server.
![]() Connect the other end of the cable to the Ethernet port of the computer to be used for setup.
Connect the other end of the cable to the Ethernet port of the computer to be used for setup.
After setup is complete, connect this end of the Ethernet cable to a network device, such as a hub.
![]() Connect the power plug of the printer to the wall outlet and turn the printer on.
Connect the power plug of the printer to the wall outlet and turn the printer on.
It may take several seconds for the printer to recognize the USB device server. If you have disconnected the USB cable, connect the USB cable again.
LED indications
If the USB device server is attached properly, the LEDs on the Ethernet port light up as follows:

During 10BASE-T operation, the upper LED lights up in green.
During 100BASE-TX operation, the lower LED lights up in yellow.
During 1000BASE-T operation, both LEDs light up.
![]()
Remove the cover of USB port B on the printer and connect the port to the USB port of the USB device server.
