This section describes the user tools in the Initial Settings menu under Fax Features.
Parameter Setting
User Parameters allow you to customize various settings to suit your needs.
For details about Parameter Setting, see Parameter Settings.
Parameter Setting: Print List
You can print Parameter Setting list.
Print this list to see the current User Parameter settings. However, not all the parameter settings are printed.
Press [Fax Features].
Press [Initial Settings].
Press [Parameter Setting: Print List].
Press [Start].
Press [Exit].
Program Closed Network Code
Register an ID required for Closed Network communication.
Register a four-digit number using 0 to 9 and A to F (except for 0000 and FFFF).
Press [Fax Features].
Press [Initial Settings].
Press [Program Closed Network Code].
Enter an ID using the number keys and [A] to [F], and then press [
 ].
].Press [OK].
Press [Exit].
Program Memory Lock ID
Program a Memory Lock ID to be entered before printing documents when the Memory Lock function is activated.
A Memory Lock ID can be any four-digit number, except 0000.
Press [Fax Features].
Press [Initial Settings].
Press [Program Memory Lock ID].
Enter an ID using the number keys, and then press [
 ].
].Press [OK].
Press [Exit].
For details about printing a file received with Memory Lock, see Printing a File Received with Memory Lock.
Internet Fax Setting
You can select to display the Internet Fax tab or not. When you want to send an Internet Fax, set On to display the tab.
Default: [Off]
Select Dial / Push Phone
Use this function to select a line type when the machine is connected to a G3 analog line.
Dial and Push lines are available for selection.
This function is not available in some regions.
Default: [Push Button Phone]
Press [Fax Features].
Press [Initial Settings].
Press [Select Dial / Push Phone].
Press [Push Button Phone] or [Dial Phone (10PPS)] to select the line, and then press [OK].
Press [Exit].
Program Fax Information
Program information to be shown on the display of the other machine and printed as a report. The following information can be programmed.
Fax Header
Own Name
Own Fax Number
For details about how to program Fax Information, see Registering Fax Information.
Enable IP-Fax H.323
Specify whether or not H.323 is used for IP-Fax transmission.
Default: [Off]
Enable IP-Fax SIP
Specify whether or not SIP is used for IP-Fax transmission.
Default: [Off]
H.323 Settings
Set the IPv4 address or host name, and alias telephone number of the gatekeeper.
If you select "On" using the User Parameters, you can use the gatekeeper server. See Parameter Settings (switch 34, bit 0).
You can use numbers, and symbols ("![]() " and "
" and "![]() ") for registration of the alias telephone number in H.323 Settings. Make sure you enter these characters correctly.
") for registration of the alias telephone number in H.323 Settings. Make sure you enter these characters correctly.
Press [Fax Features].
Press [Initial Settings].
Press [H.323 Settings].
Configure the settings for the item you want to register.
Press [Change] for the item you want to register, and then enter the characters.
To register a gatekeeper address, enter the IPv4 address, and then press [OK].
To register an alias telephone number, enter the alias telephone number using the number keys, and then press [OK].
Press [OK].
Press [Exit].
SIP Settings
Set the SIP server's IP address or host name, and SIP user name.
SIP server's IP address
You can register either an IPv4 or IPv6 address for the SIP server. You cannot register an IPv4-mapped address.
A proxy server relays call requests and responses.
A redirect server processes request destination inquiries.
A register server registers location information of user agents (which correspond to telephones or facsimiles on public telephone lines) on an IP network.
Use numbers and periods (".") to enter the correct IPv4 addresses for the SIP server. To obtain the correct IP addresses, consult the administrator.
SIP user name
You can use alphanumeric symbols (lower and upper cases) and symbols (";", "?", ":", "&", "=", "+", "$", ",", "-", "_", ".", "!", "
 ", "
", " ", "
", " ", "'", "(", ")", "%", "/", "[", "]", and "@") for registration of the SIP User Name. Make sure you enter these characters correctly.
SIP digest authentication
You can use alphanumeric symbols (lower and upper cases) and symbols ("!", "$", "%", "&", "'", "(", ")", "*", "+", ",", "-", ".", "~", "=", "_") for passwords for SIP digest authentication.
If you select "On" using the User Parameters, you can use the SIP server. See Parameter Settings (switch 34, bit 1).
Press [Fax Features].
Press [Initial Settings].
Press [SIP Settings].
Configure the settings for the item you want to register.
Press [Change] for the item you want to register, and then enter the characters.
To register a proxy server, redirect server or register server, enter the SIP server's IP address, and then press [OK].
To register a SIP user name, enter the SIP user name, and then press [OK].
To use SIP digest authentication, press [Set], and then enter the user name and the password.
Press [Change] under [User Name], enter the user name, and then press [OK].
Press [Enter] under [Password], enter the password up to 128 characters, and then press [OK].
Re-enter the password after the message Confirm Password appears on the screen, and then press [OK].
Press [OK].
Press [Exit].
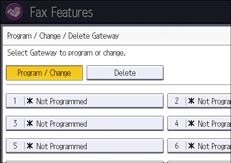
Program / Change / Delete Gateway
Register, change, or delete the gateway used for transmission to IP-Fax.
Gateway address
You can register either an IPv4 or IPv6 address for the Gateway. You cannot register an IPv4-mapped address.
Prefix
For documents sent using a VoIP gateway to G3 Fax, prefixes can be used. If the first several digits of IP-Fax number and the gateway- specific prefix are identical, documents can be transmitted using the registered digits of the gateway. For example, if both 03 and 04 have been registered as gateway number while 0312345678 is also specified, documents can be transmitted via a VoIP gateway for which 03 is used as a prefix.
When you want to use the gateways regardless of the IP-Fax destination numbers, register only the gateway addresses without registering the prefix.
Program / Change
Press [Fax Features].
Press [Initial Settings].
Press [Program / Change / Delete Gateway].
Check that [Program / Change] is selected.
Press a VoIP gateway to register.
When registering a new VoIP gateway, press [Not Programmed].

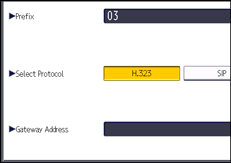
Press [Change] for [Prefix].
Enter the Prefix using the number keys, and then press [OK].
To change the existing prefix, press [Clear], and then enter a new prefix.
Select a protocol.

Press [Change] for [Gateway Address].
Enter the gateway address, and then press [OK].
Press [OK].
Press [Exit] twice.
Delete
Press [Fax Features].
Press [Initial Settings].
Press [Program / Change / Delete Gateway].
Press [Delete], and then select a VoIP gateway to delete.
Press [Delete] on the confirmation message.
Press [Exit] twice.
Menu Protect
You can prevent unauthenticated users from changing the user tools settings.
For details about Menu Protect, see "Specifying Menu Protect", Security Guide.
Email Setting
Specify whether or not to use [Email] in the fax functions.
Default: [Off]
Folder Setting
Specify whether or not to use [Folder] in the fax functions.
Default: [Off]
Country Code
Selects the country in which the machine is used. The country code you specify determines the time and date display format and the default values of the fax transmission-related settings.
Make sure to select the country code correctly. Selecting a wrong country code may cause failures in fax transmissions.
File Type to Transfer
Specify the file format for files transmitted to e-mail addresses and folders registered as forwarding, destinations of backup file transmission, receivers for Personal Box, or end receivers for Transfer Box.
TIFF
PDF
PDF/A
Default: [TIFF]
Security for Email TX Results
Configure whether or not to apply encryption and/or a signature to e-mails transmitted with the Email TX Results function.
Encryption
Signature
Press [Fax Features].
Press [Initial Settings].
Press [
 Next].
Press [Security for Email TX Results].
To encrypt e-mails, press [Encryption].
To attach a signature to an e-mail, press [Signature].
Press [OK].
Press [Exit].
For details about the security setting, see Encryption and Signature for Internet Fax/E-Mail.
![]()
For details about how to change the Fax Features, see "Accessing User Tools", Connecting the Machine/ System Settings.
