![]()
When Auto Erase Memory is set to [On], temporary data that remained on the hard disk when Auto Erase Memory was set to [Off] might not be overwritten.
If the main power switch is turned off before Auto Erase Memory is completed, overwriting will stop and data will be left on the hard disk.
Do not stop the overwrite mid-process. Doing so will damage the hard disk.
If the main power switch is turned off before Auto Erase Memory is completed, overwriting will continue once the main power switch is turned back on.
If an error occurs before overwriting is completed, turn off the main power. Turn it on, and then repeat from Step 1.
The machine will not enter Sleep mode until overwriting has been completed.
![]() Log in as the machine administrator from the control panel.
Log in as the machine administrator from the control panel.
![]() Press [System Settings].
Press [System Settings].
![]() Press [Administrator Tools].
Press [Administrator Tools].
![]() Press [
Press [![]() Next] twice.
Next] twice.
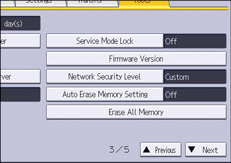
![]() Press [Auto Erase Memory Setting].
Press [Auto Erase Memory Setting].

![]() Press [On].
Press [On].
![]() Select the overwriting method you want to use.
Select the overwriting method you want to use.
If you select [NSA] or [DoD], proceed to Step 10.
If you select [Random Numbers], proceed to Step 8.
![]() Press [Change].
Press [Change].
![]() Enter the number of times that you want to overwrite using the number keys, and then press [
Enter the number of times that you want to overwrite using the number keys, and then press [![]() ].
].
![]() Press [OK].
Press [OK].
Auto Erase Memory is set.
![]() Log out.
Log out.
![]()
If you enable both overwriting and data encryption, the overwriting data will also be encrypted.
