The print time of the Hold Print files stored in the machine can be changed using the control panel. You can also set or cancel the print time of a Hold Print file.
![]() Press [Home] (
Press [Home] (![]() ) at the bottom of the screen in the center.
) at the bottom of the screen in the center.
![]() Press the [Printer (Classic)] icon.
Press the [Printer (Classic)] icon.
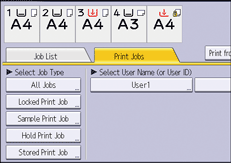
![]() Press the [Print Jobs] tab.
Press the [Print Jobs] tab.

![]() Press [Hold Print Job].
Press [Hold Print Job].
![]() Select the Hold Print file that you want to change the print time.
Select the Hold Print file that you want to change the print time.
![]() Press [Set Print Time].
Press [Set Print Time].
![]() Enter the print time using the number keys.
Enter the print time using the number keys.
To cancel the print time, press [Cancel].
![]() Press [OK] or [
Press [OK] or [![]() ].
].
![]()
You can also change, add, or cancel the print time specified for a Hold Print file from Web Image Monitor. For details, see Web Image Monitor Help.
