[Switch]
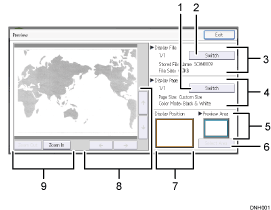
You can switch to a preview of another page.
[Switch]
You can switch to a preview of another file.
Display File
The name and size of the selected file appear.
Display Page
The page number of the previewed page, total number of pages, page size, and color mode appear.
Preview Area
Shows which section of the original is displayed by the preview function.
If the original of a stored file was larger than A2 (18 × 24), only a specified section of the file can be displayed in the preview. Use the area, size, and direction settings to specify the section that is displayed in the preview. To specify these settings, select [Select Area].
[Select Area]
If you are viewing a file that is larger than A2 (18 × 24), press this key to specify the area, size, and direction of the displayed preview.
Display Position
When the preview is enlarged, the location of the part of the page displayed on the preview screen is indicated.
[
 ] [
] [ ] [
] [ ] [
] [ ]
]Press to shift the displayed area.
[Zoom Out], [Zoom In]
In previewing, you can reduce or enlarge the file image.
![]()
You can reduce or enlarge the previewed image by double-tapping it, and scroll the enlarged image by tapping it.
If the original of a stored file was longer than 1,219 mm (48 inches), the file cannot be displayed as a preview.
