This section explains how to load a paper roll into the paper input location.
![]()
Bring the paper holder flush against the paper edge to fasten the paper.
Insert the paper holder flange securely.
Make sure not to load a paper roll in the opposite direction.
Before loading the paper roll into the paper input location, remove any paper that is in the paper bypass location.
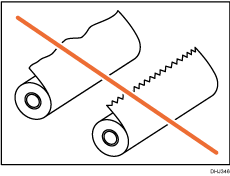
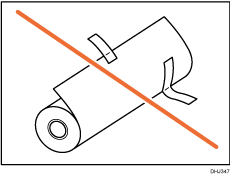
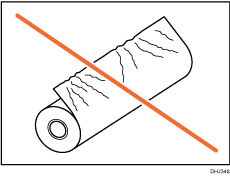
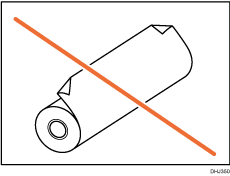
When the paper roll is in one of the following conditions, you cannot use it. Cut off the edge of the paper with scissors before loading it.
The leading edge is damaged
Adhesive tape, glue or paste is sticking to it
The paper is wrinkled
The corners are folded
The paper curls away from the paper roll
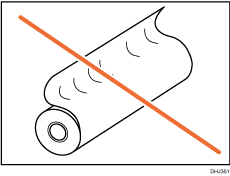
The edge is dented
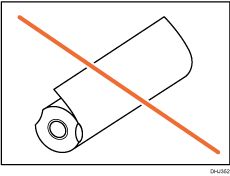
The paper has holes in it
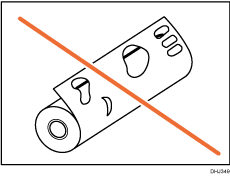
The paper is torn
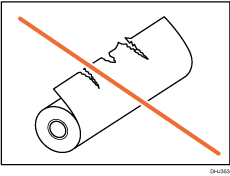
If you cut off the paper edges of a paper roll that is installed in the paper input location, be careful not to cut the cloth part of the output basket.
When removing paper rolls from the paper input locations, lift the flanges on either side of the paper roll before removing them. Do not lift one side only. This could damage the machine.
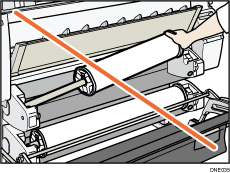
Do not squeeze the flange into the paper roll when the end face of the paper roll is not aligned to the paper core or when a small quantity of paper is left. If the flange is squeezed too tightly against the paper roll, the edge of the paper may crease or wrinkle.
To cut paper edges with scissors, cut the paper vertically to the feed direction, so that the paper edges can be pulled into the machine.
Load the paper roll when the power of the machine is on.
Check that the output basket is in basic mode before loading a paper roll. For details, see Setting Up the Output Basket in Basic Mode.
The paper roll is heavy and may need to be lifted by two people.
When replacing paper holder to other paper roll, place the paper roll on a flat surface.
Names of the parts of the paper holder
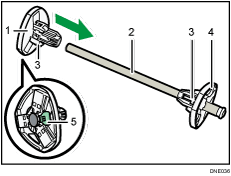
Left flange
Spool
Paper roll adjustment levers
Right flange
Lock lever
Paper roll direction
When loading the paper roll to the paper holder and machine, make sure that the edge of the paper feeds from top of the roll toward the front.
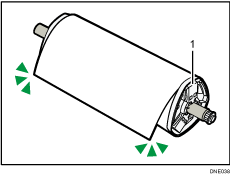
Right flange
You can load the paper roll into Paper Input Locations 1 and 2. Each paper input location is loaded in the same way. In the following example procedure, the paper roll is loaded into Paper Input Location 1.
![]() Press [Home] (
Press [Home] (![]() ) at the bottom of the screen in the center.
) at the bottom of the screen in the center.
![]() Press the [Copy] or [Printer (Classic)] icon.
Press the [Copy] or [Printer (Classic)] icon.
Make sure that “Ready” appears on the screen.
![]() Lift up the paper input location cover until it clicks.
Lift up the paper input location cover until it clicks.
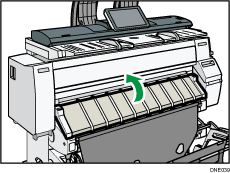
Lock the paper input location cover while it is open.
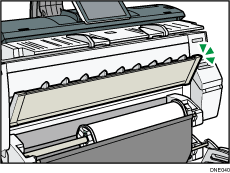
![]() Remove bar A, and then hook it in front of the output basket.
Remove bar A, and then hook it in front of the output basket.
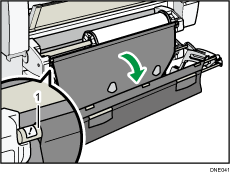
Bar A
You can see the paper input location.
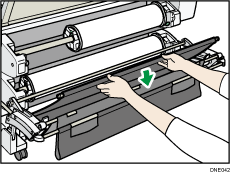
![]() Pull bar B forward.
Pull bar B forward.
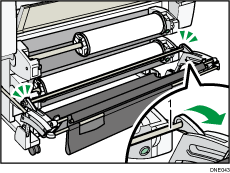
Bar B
A space opens in front of the paper input location.
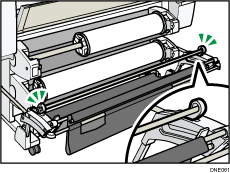
![]() Press down the rewind button on the right of the paper input location for one second or more.
Press down the rewind button on the right of the paper input location for one second or more.
After you release the button, the paper is rewound automatically.
If the paper is not rewound, press the button again.
If there is no paper roll loaded, proceed to Step 12.
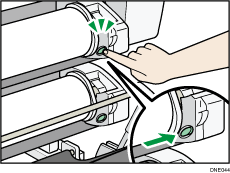
![]() Hold the left and right flanges firmly, and then remove the paper roll or spool from the paper input location.
Hold the left and right flanges firmly, and then remove the paper roll or spool from the paper input location.
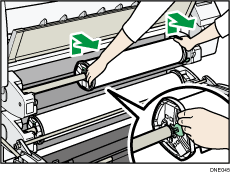
![]() Place the paper roll or spool on a flat surface.
Place the paper roll or spool on a flat surface.
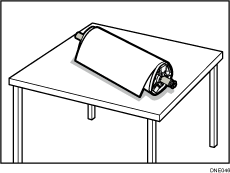
![]() Raise the lock lever on the left flange.
Raise the lock lever on the left flange.
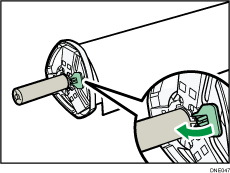
![]() Remove the left flange from the spool.
Remove the left flange from the spool.
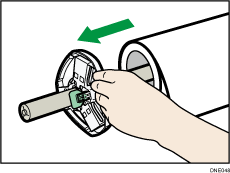
![]() Remove both the right flange and spool from the paper roll.
Remove both the right flange and spool from the paper roll.
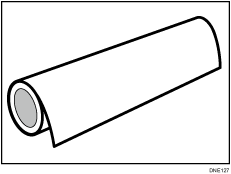
![]() Prepare the paper roll for replacement.
Prepare the paper roll for replacement.
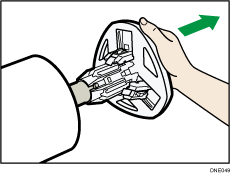
![]() Insert a spooling flange to touch the paper roll from the right of it.
Insert a spooling flange to touch the paper roll from the right of it.
Set the paper roll as shown in the illustration.
Place the paper roll on a flat horizontal surface, and then slowly insert the flange into the paper roll. Do not stand the paper roll upright. The flange may be damaged if you throw it down when inserting it.
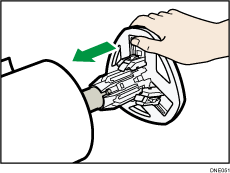
![]() Insert the spool into the left flange slowly so as not to damage the flange, and then lower the lock lever on the left flange.
Insert the spool into the left flange slowly so as not to damage the flange, and then lower the lock lever on the left flange.
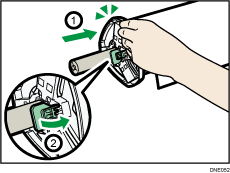
![]() Hold both flanges and place the paper roll on the paper input location.
Hold both flanges and place the paper roll on the paper input location.
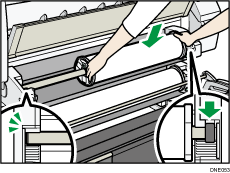
Be sure to place the spool so that its right edge is covered by the black shutter.
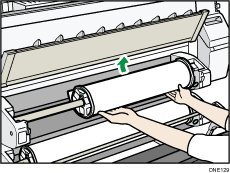
![]() Rotate the paper roll so that the edge of the paper comes to the front.
Rotate the paper roll so that the edge of the paper comes to the front.
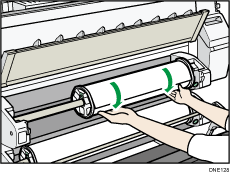
![]() Rotate the paper roll so that the edge of the paper goes above the lower guides.
Rotate the paper roll so that the edge of the paper goes above the lower guides.
When you insert the paper between the guides, it is clamped internally.
When set correctly, the paper is pulled into the machine and the beeper sounds.
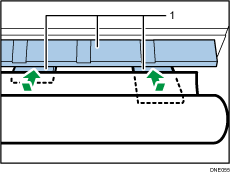
Guides
![]() Push bar B into the machine, and then lift bar A up and hook it.
Push bar B into the machine, and then lift bar A up and hook it.
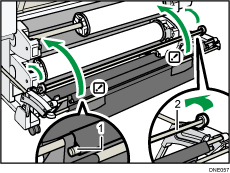
Bar A
Bar B
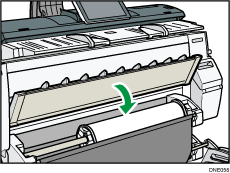
![]() Lower the paper input location cover.
Lower the paper input location cover.
![]() Make sure that the [Copy] or [Printer (Classic)] screen is displayed.
Make sure that the [Copy] or [Printer (Classic)] screen is displayed.
![]() On the screen, press [Exit].
On the screen, press [Exit].
![]() Select whether or not to cut off the edge of the paper roll on the screen.
Select whether or not to cut off the edge of the paper roll on the screen.
Select [Cut] when the edge of the paper is cut manually, such as with scissors, or the paper is expanded due to moisture.
![]() Follow the on-screen instructions to specify the paper type and thickness of the paper roll.
Follow the on-screen instructions to specify the paper type and thickness of the paper roll.
Press [Matches] if the paper type and thickness of paper roll you loaded are the same as those displayed on the screen.
If the paper type and thickness are different from those displayed, press [Does not Match]. Select the proper items according to the paper type and thickness you want to use, and then press [OK].
![]() Make sure that [
Make sure that [![]() ] is displayed at paper input location 1 on the screen.
] is displayed at paper input location 1 on the screen.
![]()
When [Film (Matte)] is specified for Paper Type or when Prevent Paper Abrasion is specified, press [Exit] on the screen after lowering the paper input location cover. You can change the Prevent Paper Abrasion setting in System Settings if necessary. However, if you specify [Film (Matte)] for Paper Type, the Prevent Paper Abrasion setting is automatically selected, and you cannot change it. For details about Prevent Paper Abrasion, see "System Settings", Connecting the Machine/ System Settings.
When the settings in Step 23 are finished, the machine pulls the paper inside, and paper is output about one meter (40 inches) from the paper output location. Then the machine rewinds the paper to the prescribed position. Do not touch the output paper until the machine stops moving. If you select [Cut] in Step 22, the edge of the paper is cut off.
If you insert a roll of paper into the machine at an angle or if there is space between the paper and the flanges, the paper may not be pulled into the inside of the machine. If that happens, return to Step 3 and start again.
When loading two paper rolls into the paper input locations 1 and 2, make sure that [
 ] is displayed at the paper input location you loaded first, and then load the other paper roll into the other paper input location.
When the [Notification Sound] is set to [No Sound], it will not sound if you insert paper into the paper input location. For details about [Notification Sound], see "Screen Features", Connecting the Machine/ System Settings.
When printing from a computer, see Printing from the Paper Input Location Using the Printer Function.
You can specify the types of paper you load in the paper input location in advance. For details, see "System Settings", Connecting the Machine/ System Settings.
For details about the settings for the paper thickness and types, see "System Settings", Connecting the Machine/ System Settings.
For details about how to store the paper roll, see Paper Storage.
