The Memory Storage Device function allows you to read and print files that are stored on a memory storage device such as an SD card or USB flash memory device. Also, you can save the scanned data on a memory storage device.
The files in the following formats can be printed using the Memory Storage Device function: JPEG, TIFF, PDF, XPS, and OXPS. The scanned data can be saved in JPEG, TIFF, or PDF format.
Printing a file in a memory storage device
![]() Press [Home] (
Press [Home] (![]() ) at the bottom of the screen in the center.
) at the bottom of the screen in the center.
![]() Press the [Print/Scan(Memory Storage Device)] icon.
Press the [Print/Scan(Memory Storage Device)] icon.
![]() Press [Print].
Press [Print].
![]() Insert a memory storage device in the media slot.
Insert a memory storage device in the media slot.
For details about how to insert a memory storage device, see "Inserting/Removing a Memory Storage Device", Getting Started.
![]() Press [USB] or [SD Card], depending on the type of the storage device.
Press [USB] or [SD Card], depending on the type of the storage device.
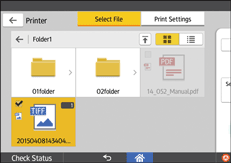
![]() Select the document to print.
Select the document to print.

You can perform the following operations on the selected document:
Preview
Shows the preview image of the first page of the document.
Selected
Displays the list of the selected documents.
![]() If necessary, press [Print Settings] to change the settings such as the number of copies.
If necessary, press [Print Settings] to change the settings such as the number of copies.
![]() Press [Start].
Press [Start].
Saving the scanned data in a memory storage device
![]() Press [Home] (
Press [Home] (![]() ) at the bottom of the screen in the center.
) at the bottom of the screen in the center.
![]() Press the [Print/Scan(Memory Storage Device)] icon.
Press the [Print/Scan(Memory Storage Device)] icon.
![]() Press [Scan].
Press [Scan].
![]() Insert a memory storage device in the media slot.
Insert a memory storage device in the media slot.
For details about how to insert a memory storage device, see "Inserting/Removing a Memory Storage Device", Getting Started.
![]() Press [USB] or [SD Card], depending on the type of the storage device that you are using.
Press [USB] or [SD Card], depending on the type of the storage device that you are using.
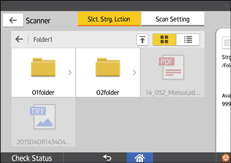
![]() Specify the location to save the scanned data.
Specify the location to save the scanned data.

![]() If necessary, press [Scan Setting] to change the settings such as the file type or scan resolution.
If necessary, press [Scan Setting] to change the settings such as the file type or scan resolution.
![]() To see the scanned image before saving it to a file, press [Preview].
To see the scanned image before saving it to a file, press [Preview].
![]() Place the originals, and then press [Start].
Place the originals, and then press [Start].
![]() When the preview screen appears, check the scanned image, and then press [Save].
When the preview screen appears, check the scanned image, and then press [Save].
![]()
If the file name is not specified in [Scan Settings], the scanned image is saved under the name that conforms to the following naming rules:
For single page format:
Transmission date and time (YYYYMMDDHHMMSSMMM) + 4 digit serial page number (_nnnn) + extension (.tif/.jpg/.pdf)
For example, when you send 10-page original in jpeg format at 15:30:15.5 on Dec. 31, 2020, the file names are from "20201231153015500_0001.jpg" to "20201231153015500_0010.jpg".
For multi page format:
Transmission date and time (YYYYMMDDHHMMSSMMM) + extension (.tif/.jpg/.pdf)
For example, when you send 10-page original in PDF format at 15:30:15.5 on Dec. 31, 2020, the file name is "20201231153015500.pdf".
When storing the data on a solid-state storage device, enter the file name using ASCII alphanumeric characters or symbols that support ASCII. Otherwise, the file may not be read or stored.
