The quick applications allow you to modify settings simply by selecting from a list or following the order of the keys left to right so you can copy, fax, or scan documents easily.
If you want to use the features that are not available with quick applications, use the screen of each standard function.
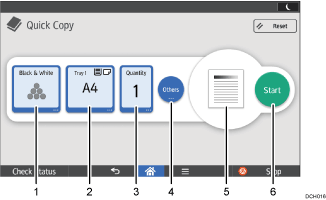
[Quick Copy] screen

Select a color mode.
Select a paper tray.
Select the number of copies.
Specify the copy settings such as duplex or combining. You can also specify scan settings.
Check the finished image.
Press to start copying.
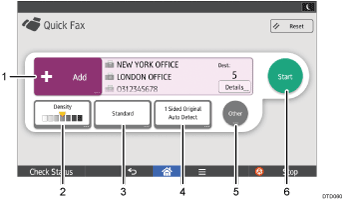
[Quick Fax] screen

Select a destination. You can also enter a destination manually.
Select the image density you want to use.
Select the resolution you want to use.
Select size and type of the original.
Press to preview the scanned original.
Press to start faxing.
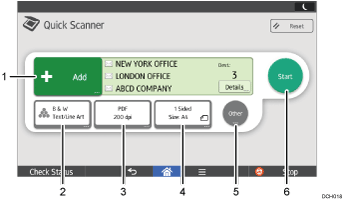
[Quick Scanner] screen

Select an e-mail or folder destination. You can also enter e-mail destination manually.
Select a color mode.
Select a scanning resolution and file type in which to send scanned data.
Select an original type and size.
Press to preview the scanned data.
Press to start sending scanned data.
![]()
 (mainly Europe and Asia)
Only A4 size paper can be fed from the bypass tray while you use the quick copy function.
 (mainly North America)
Only 81/2 × 11 size paper can be fed from the bypass tray while you use the quick copy function.
If you specify many destinations, the machine might require some time to start scanning originals after [Start] is pressed.
