Specify the IP address for the USB device server manually.
You can share the printer among multiple networks by specifying an IP address of a segment different from that of the printer.
To change the IP address for the USB device server, access the setting screen for the printer using a web browser. For details about the setting items, see the USB device server’s Help.
![]()
To use the USB device server in an IPv6 environment, it is necessary to change the network settings in an IPv4 environment first.
The printer status does not appear on your computer because the USB device server does not support bidirectional communication.
You cannot set the IP address for the USB device server using the control panel of the printer.
If you forget the IP address of the USB device server or have changed it from its default, follow the procedure below to initialize the USB device server settings:
Turn off the main power of the printer.
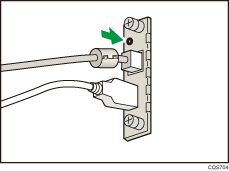
Press and hold the switch on the interface using a pointed tool such as a pen, and turn on the printer.

Both the upper and lower LEDs of the Ethernet port light up. Be sure to check the upper LED turns off and the lower LED lights up in yellow, and then release the switch.
Confirm the IP address of your computer before starting setup. The default IP address for the USB device server is ”192.168.100.100”, and the default subnet mask is ”255.255.255.0”. To perform the initial setup of the USB device server, set the IP address for your computer to “192.168.100.XXX” (XXX: 0 to 255), and the subnet mask to “255.255.255.0”. It is recommended to make a note of the current IP address before changing it.
![]() Enter ”http://192.168.100.100/” in the address bar of the Web to access the setting screen of the printer.
Enter ”http://192.168.100.100/” in the address bar of the Web to access the setting screen of the printer.
![]() Click [Network Settings].
Click [Network Settings].
![]() Enter “root” as the user name, and then click [OK].
Enter “root” as the user name, and then click [OK].
![]() Specify the IP address, Subnet Mask, and Default Gateway.
Specify the IP address, Subnet Mask, and Default Gateway.
When DHCP is enabled, the IP address can be obtained automatically from a network device with the DHCP server function.
![]() Configure the other settings as necessary, and then click [Submit].
Configure the other settings as necessary, and then click [Submit].
![]() Exit the web browser.
Exit the web browser.
![]() Disconnect the Ethernet interface cable from the computer used for setup, and then connect the cable to a network device, such as a hub.
Disconnect the Ethernet interface cable from the computer used for setup, and then connect the cable to a network device, such as a hub.
![]() Set the IP address of the USB device server in the printer driver used for printing.
Set the IP address of the USB device server in the printer driver used for printing.
![]()
The default administrator password is not specified. It is recommended that you specify the administrator password on the [Maintenance Information] screen by using up to seven alphanumeric characters.
The default network settings of the USB device server are as follows:
DHCP/BOOTP: Disable
IP Address: 192.168.100.100
Subnet Mask: 255.255.255.0
Default Gateway: 0.0.0.0
Network PnP: Enable
mDNS: Enable
LAN Interface: Auto
Primary WINS Server: 0.0.0.0
Secondary WINS Server: 0.0.0.0
It is recommended to use Internet Explorer 5.5 or later, Firefox 2.0.0 or later, or Safari 1.0.3 or later to display the setting screen for the USB device server.
The USB device server does not support “Quick Install” and installation using the SmartDeviceMonitor for Client port. A port must be set independently when a printer driver is installed.
To print using Port 9100 or LPR, see ”Using the Standard TCP/IP port” in Driver Installation Guide in the CD-ROM provided with the printer and make the following settings:
Specify the IP address for the USB device server using the “Add Standard TCP/IP Printer Port Wizard”.
Select “Custom” for the device type.
For Port 9100, select “Raw” as the protocol, and then specify “9100” for the port number. For LPR, select “LPR” as the protocol, and then specify “lp” as the queue name.
For IPP printing, see ”Using the IPP Port” in Driver Installation Guide in the CD-ROM provided with the printer. To specify the URL of the printer during the procedure for adding printers, enter “http://(IP address of the USB device server) /ipp/lp".
