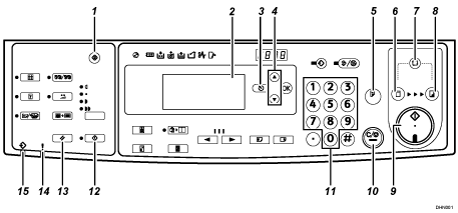
[User Tools] key (
 )
)Press to change the default settings to meet your requirements.
Panel Display
The panel display shows the machine status, error messages, and function menus.
[Escape] key ([Cancel] key)
Press to cancel a selection or entry, and to return to the previous display.
[
 ] [
] [ ] keys
Press to select an item on the panel display.
[Proof] key (
 )
)Press to make proof prints.
[Master Making] mode select key (
 )
)Press to select the master making mode.
[Auto Cycle] key (
 )
)Press to make masters and prints in a single operation.
[Print] mode select key (
 )
)Press to select the print mode.
[Start] key (
 )
)Press to make masters or start printing.
[Clear/Stop] key (
 )
)Press to cancel a number that you entered or to stop printing.
Number keys
Press to enter the number of prints you want, as well as data for certain modes.
[Hold Data-in] key (
 )
)Press to reject the online print temporarily.
[Job Reset] key (
 )
)Press this to stop job reception, processing, or printing.
Error indicator (Red)
On: An error has occurred. Master making and printing stops.
Off: Normal status
Data In indicator (
 - Green)
On: Data waiting for Master Making and printing is in the machine.
Blinking: Data is being received, or Master Making or printing is in progress.
Off: Master Making and printing are completed.
