Adjust the image position and magnification on Side 2 to match those on Side 1.
![]()
To adjust the following settings, pre-register the type of paper in use as a custom paper. For details about registering custom papers, see "Registering a Custom Paper", Paper Settings.
Adjustment Method
![]() From the supplied CD, print the file of the format matching the size of the paper requiring image position adjustment. Continuously print the format on both sides of 10 sheets.
From the supplied CD, print the file of the format matching the size of the paper requiring image position adjustment. Continuously print the format on both sides of 10 sheets.
Use the 6th sheet among the printed copies for adjustment.
![]() Through visual inspection of the 4th, 5th, and 6th sheets, check that misregistrations on Side 1 and 2 are almost the same.
Through visual inspection of the 4th, 5th, and 6th sheets, check that misregistrations on Side 1 and 2 are almost the same.
If not, adjust the misregistrations according to the usual method.
![]() In [Advanced Settings] for the registered custom paper preset, adjust the following settings to match the image position on Side 1.
In [Advanced Settings] for the registered custom paper preset, adjust the following settings to match the image position on Side 1.
002: [Adj Image Position of Side2 Across Feed]
004: [Adj Image Position of Side2 With Feed]
006: [Adj Magnification of Side2 Across Feed]
008: [Adj Magnification of Side2 With Feed]
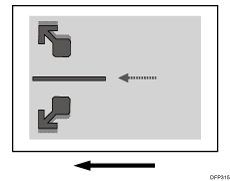
Adjusting the image position in the vertical and horizontal directions
<Across feed direction>
Adjusting the center line (A) on Side 2 to match the center line (B) on Side 1
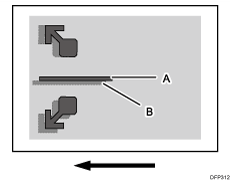
In [Advanced Setting] for the custom paper you are using, select 002: [Adj Image Position of Side2 Across Feed].
Press [+] to shift the image to the top.
Press [-] to shift the image to the bottom.
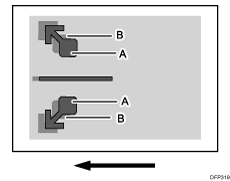
<With feed direction>
Adjusting the image (A) on the leading edge of the paper on Side 2 to match the corresponding image (B) on Side 1
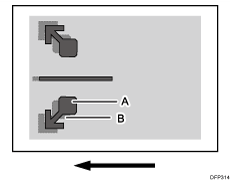
In [Advanced Setting] for the custom paper you are using, select 004: [Adj Image Position of Side2 With Feed].
Press [+] to shift the image to the left (trailing edge).
Press [-] to shift the image to the right (leading edge).
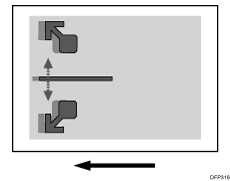
Adjusting magnification in the vertical and horizontal directions
<Across feed direction>
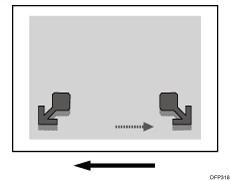
Adjusting magnification to match the length between the arrows (A) on the leading edge of the paper on Side 2 to the length between the arrows (B) on Side 1
In [Advanced Setting] for the custom paper you are using, select 006: [Adj Magnification of Side2 Across Feed].
Press [+] to increase the scaling.
Press [-] to reduce the scaling.
The adjustment value is applied evenly both upward and downward.
To feed A3 paper with its short side parallel to the paper feed direction, increase the value by 0.025% to move the image by approximately 0.1 mm.
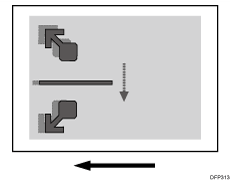
<With feed direction>
Adjusting magnification to match the position of the arrow (A) on the trailing edge of the paper on Side 2 to the position of the arrow (B) on Side 1
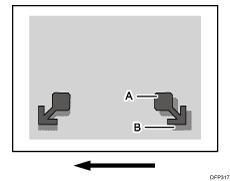
In [Advanced Setting] for the custom paper you are using, select 008: [Adj Magnification of Side2 With Feed].
Press [+] to increase the scaling.
Press [-] to reduce the scaling.
To feed A3 paper with its long side parallel to the paper feed direction, increase the value by 0.025% to move the image by approximately 0.07 mm.