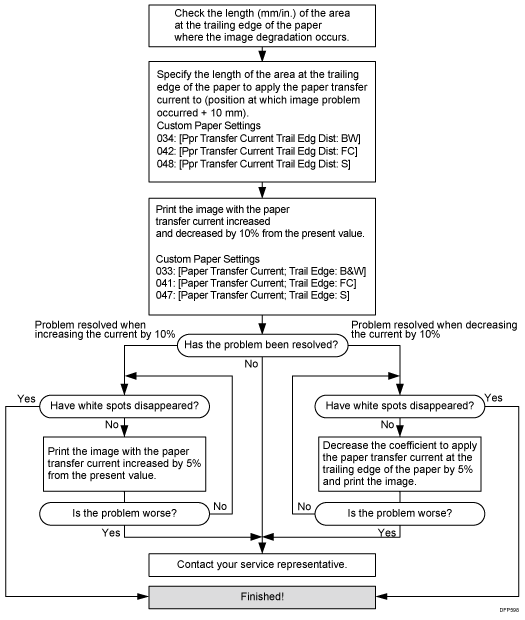
Carry out the following sequence of procedures. Terminate the sequence as soon as the problem is resolved.
Procedure 1: Adjusting the disengage timing of paper transfer

*1: Printing in full color including the clear toner and the special color is set to high quality/printing in full color including the white toner
*2: Printing in full color/Printing in full color including the clear toner while the special color is not set to high quality
Length of the area with white spots at the trailing edge (mm) |
Process speed setting |
||
|---|---|---|---|
High |
Middle |
Low |
|
1 |
-3 |
-3 |
-6 |
2 |
-6 |
-6 |
-12 |
3 |
-9 |
-9 |
-18 |
4 |
-12 |
-12 |
-24 |
5 |
-15 |
-15 |
-30 |
6 |
-18 |
-18 |
-36 |
7 |
-21 |
-21 |
-42 |
8 |
-24 |
-24 |
-48 |
If the length of the area with white spots at the trailing edge measured using a ruler is 3 mm and the process speed is set to [Middle], decrease the value by 9 increments from the present value.
If it is below the lower limit, set it to the lower limit.
![]()
Changing the value in "Adjust Disengage Timing of Paper Transfer" or 078: [Adjust Gap of Paper Transfer], 082: [Adj Diseng Timing of Ppr Trns: Small], 083: [Adj Diseng Timing of Ppr Trns: Large] or 084: [Adj Diseng Timing of Ppr Trns: Sml/Lrg] may cause the jitter to worsen.
Procedure 2: Adjusting the paper transfer current at the trailing edge

Depending on the problem, adjust the following correction coefficient:
Printing in black and white: 033: [Paper Transfer Current; Trail Edge: B&W]
Printing in full color or full color + special color: 041: [Paper Transfer Current; Trail Edge: FC]
Printing in special color only: 047: [Paper Transfer Current; Trail Edge: S]
