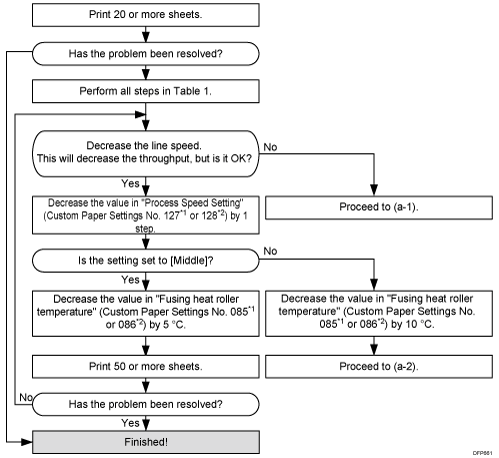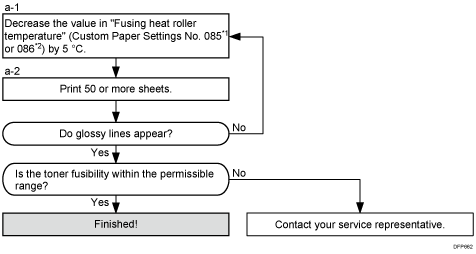

Settings to adjust |
What to do |
|---|---|
090: [Adj Fsng Tmp to Trnsf Ppr: Ppr: Qual] 092: [Adj Fsng Tmp to Trnsf Ppr: Ppr: Qual: S]*3 |
Increase the value by 1. |
093: [Adjust Adding Fusing Temperature 1] 094: [Adjst Addng Fusng Tempratre 1: Special]*3 |
Set to 0 degrees. |
095: [Adjust Adding Fusing Temperature 2] 096: [Adjst Addng Fusng Tempratre 2: Special]*3 |
When 127: [Process Speed Setting: Productivity] or 128: [Process Speed Setting: Quality] in [Advanced Settings] for the custom paper you are using is set to [High] or [Middle], set the value to 15 degrees. When 127: [Process Speed Setting: Productivity] or 128: [Process Speed Setting: Quality] is set to [Low], set the value to 5 degrees. |
131: [Rdc. Init. CPM: Low Tmp. Envir.: Prod.]*2 132: [Rdc. Init. CPM: Low Tmp. Envir.: Qual.]*1 |
Set to [Reduce Level 3]. |
133: [Rdc. In. CPM: N./H. Temp. Envr.: Prod.] *2 134: [Rdc. In. CPM: N./H. Temp. Envr.: Qual.] *1 |
Set to [Reduce Level 3]. |
*1: Printing in full color including the clear toner and the special color is set to high quality/printing in full color including the white toner
*2: Printing in full color/Printing in black and white/Printing in full color including the clear toner while the special color is not set to high quality
*3: Special color mode is available for Pro C7100X, Pro C7110X, Pro C7100SX, and Pro C7110SX.
![]()
After performing the solution, it is recommended to perform the color calibration of the external controller.
