![]() Press the [Home] key on the bottom left of the control panel, and press the [Address Book Management] icon on the [Home] screen.
Press the [Home] key on the bottom left of the control panel, and press the [Address Book Management] icon on the [Home] screen.
If the [Address Book Management] icon does not appear, press the ![]() icon at the upper right corner of the screen to switch to the [Home] screen.
icon at the upper right corner of the screen to switch to the [Home] screen.
![]() Check that [Program / Change] is selected.
Check that [Program / Change] is selected.
![]() Select the name to remove from a group.
Select the name to remove from a group.
Press the name key, or enter the registered number using the number keys.
You can search by the registered name, user code, folder name, or e-mail address.
![]() Press [Add to Group].
Press [Add to Group].
![]() Select the group from which you want to remove the name.
Select the group from which you want to remove the name.
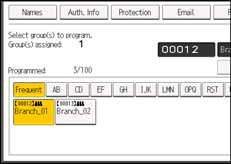
The group key is deselected and the name is removed from it.
![]() Press [OK].
Press [OK].
![]() Press the [User Tools] key.
Press the [User Tools] key.