Nozzle Check Pattern
Follow the procedure below to check whether the print head nozzles are clogged up or not by printing a nozzle check test pattern.
![]() Press the [User Tools] key.
Press the [User Tools] key.
![]() Press [Login].
Press [Login].
![]() Enter the login password, and then press the [OK] key.
Enter the login password, and then press the [OK] key.
![]() Press the [
Press the [![]() ] or [
] or [![]() ] key to display [Maintenance], and then press the [OK] key.
] key to display [Maintenance], and then press the [OK] key.
![]() Press the [
Press the [![]() ] or [
] or [![]() ] key to display [Nozzle Check Pattern], and then press the [OK] key.
] key to display [Nozzle Check Pattern], and then press the [OK] key.
![]() Press the [B&W Start] or [Color Start] key.
Press the [B&W Start] or [Color Start] key.
A test pattern is printed.
![]() Press [Exit].
Press [Exit].
![]() Press the [Escape] key.
Press the [Escape] key.
![]() Check the printed test pattern.
Check the printed test pattern.
Printed Test Pattern

Using the test pattern, check for print head clogging and the number of the clogged head.
The number appearing above each color in the test pattern is the number of the print head.
The print head for black and cyan is [Head 1].
The print head for yellow and magenta is [Head 2].
Check which print head is clogged by referring to the following illustration.
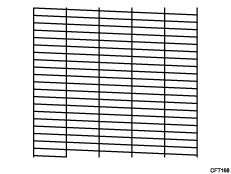
Normal

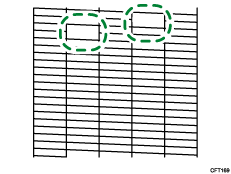
When print heads are clogged

If the print head is clogged, perform Head Cleaning. See Clean Print-heads![]() .
.
If the problem persists, perform Head Flushing. See Flush Print-heads![]() .
.

