In addition to providing basic security through user authentication and each administrator's specified limits to access the machine, security can also be increased by encrypting transmitted data and data in the Address Book.
![]() Log in from the control panel as an administrator with privileges.
Log in from the control panel as an administrator with privileges.
![]() Press [System Settings].
Press [System Settings].
![]() Press [Administrator Tools].
Press [Administrator Tools].
![]() Press [
Press [![]() Next].
Next].
![]() Press [Extended Security].
Press [Extended Security].
![]() Press the setting you want to change, and change the settings.
Press the setting you want to change, and change the settings.
![]() Press [OK].
Press [OK].
![]() Log out.
Log out.
![]()
The operation privileges of an administrator differ depending on the setting.
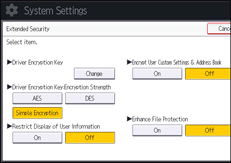
Driver Encryption Key
The network administrator can specify this.
Specify a text string to decrypt login passwords or file passwords sent from the driver when user authentication is set to ON.
To specify a driver encryption key, register the encryption key specified using the machine in the driver.
For details, see Specifying a Driver Encryption Key.
Driver Encryption Key:Encryption Strength
The network administrator can specify this.
Specify encryption strength for sending jobs from the driver to the machine.
The machine checks the encryption strength of the password appended to a job and processes it.
If [Simple Encryption] is specified, all jobs that are verified by user authentication are accepted.
If [DES] is specified, jobs encrypted with DES or AES are accepted.
If [AES] is specified, jobs encrypted with AES are accepted.
If you select [AES] or [DES], specify the encryption settings using the printer driver. For details about specifying the printer driver, see the printer driver Help.
Default: [Simple Encryption]
Restrict Display of User Information
The machine administrator can specify this if user authentication is specified.
When the job history is checked using a network connection for which authentication is not provided, all personal information can be displayed as "********". For example, when a user without administrator privileges checks the job history using SNMP in Device Manager NX, personal information can be displayed as "********" so that users cannot be identified. Because information identifying registered users cannot be viewed, unauthorized users are prevented from obtaining information about the registered files.
Default: [Off]
Encrypt User Custom Settings & Address Book
The user administrator can specify this.
Encrypt the individual settings of the machine users and the data in the Address Book.
Even if the machine's internal information is obtained illegally, encryption prevents the individual user settings or the Address Book data from being read.
For details, see Protecting the Address Book.
Default: [Off]
Enhance File Protection
The file administrator can specify this.
By specifying a password, the file administrator can limit operations such as printing, deleting, and sending files. Also, the file administrator can prevent unauthorized users from accessing the files. However, it is still possible to prevent passwords from being cracked.
By specifying "Enhance File Protection", files are locked and inaccessible if an invalid password is entered ten times. This can protect files from unauthorized access attempts using random passwords.
When "Enhance File Protection" is specified, (![]() ) appears in the lower right corner of the screen.
) appears in the lower right corner of the screen.
The locked files can only be unlocked by the file administrator.
When files are locked, it is not possible to select them even if the correct password is entered.
Default: [Off]
Restrict Use of Destinations (Fax), Restrict Use of Destinations (Scanner)
The user administrator can specify this.
The available fax and scanner destinations are limited to the destinations registered in the Address Book.
No user can directly enter the destinations for transmission.
If "Restrict Use of Destinations (Scanner)" is set to [On], you can register fax numbers only.
If you specify the setting to receive e-mails via SMTP, you cannot use "Restrict Use of Destinations (Fax)" and "Restrict Use of Destinations (Scanner)".
The destinations searched by "LDAP Search" can be used.
For details, see Restricting Usage of the Destination List.
Default: [Off]
Restrict Adding of User Destinations (Fax), Restrict Adding of User Destinations (Scanner)
The user administrator can specify this.
If you set "Restrict Adding of User Destinations (Fax)" and/or "Restrict Adding of User Destinations (Scanner)" to [Off], users will be able to register a fax or scanner destination in the Address Book simply by entering the destination and pressing [Prg. Dest.]. If you set these functions to [On], the [Prg. Dest.] key will not appear. Despite this, users can enter a destination directly using the fax or scanner screen while they cannot register that destination in the Address Book by pressing [Prg. Dest.].
Also, note that even if you set these functions to [On], users registered in the Address Book can change their passwords. Only the user administrator can change items other than the password.
Default: [Off]
Transfer to Fax Receiver
The machine administrator can specify this.
If you use [Forwarding] or [Transfer Box] under the fax function, files stored on the machine can be transferred or delivered.
To prevent stored files being transferred by mistake, select [Prohibit] for this setting.
Default: [Do not Prohibit]
If you select [Prohibit] for this setting, the following functions are disabled:
Forwarding
Transfer Box
Delivery from Personal Box
Information Box
Delivery of Mail Received via SMTP
Routing Received Documents
For details, see "Reception Functions", Fax.
Authenticate Current Job
The machine administrator can specify this.
This setting allows you to specify whether or not authentication is required for operations such as canceling jobs under the copier and printer functions.
If you select [Login Privilege], authorized users and the machine administrator can operate the machine. When this is selected, authentication is not required for users who logged in to the machine before [Login Privilege] was selected.
If [Access Privilege] is specified, any user who performed a copy or print job can cancel the job. Also, the machine administrator can cancel the user's copy or print job.
Even if you select [Login Privilege] and log on to the machine, you cannot cancel a copy or print job that is being processed if you are not privileged to use the copy and printer functions.
You can specify "Authenticate Current Job" only if "User Authentication Management" was specified.
Default: [Off]
@Remote Service
The machine administrator can specify this.
Communication via HTTPS for @Remote Service is disabled if you select [Prohibit].
When setting it to [Prohibit], consult with your service representative.
If it is set to [Proh. Some Services], it becomes impossible to change settings via a remote connection, providing optimally secure operation.
Default: [Do not Prohibit]
Update Firmware
The machine administrator can specify this.
This setting is to specify whether or not to allow firmware updates on the machine. A service representative updates the firmware, or firmware updates are performed via the network.
If you select [Prohibit], the machine's firmware cannot be updated.
If you select [Do not Prohibit], there are no restrictions on firmware updates.
Default: [Do not Prohibit]
Change Firmware Structure
The machine administrator can specify this.
This setting is to specify whether or not to prevent changes in the machine's firmware structure. The Change Firmware Structure function detects the machine's status when the SD card is inserted, removed or replaced.
If you select [Prohibit], the machine stops during startup if a firmware structure change is detected and a message requesting administrator login is displayed. After the machine administrator logs in, the machine finishes startup with the updated firmware.
The administrator can check if the updated structure change is permissible or not by checking the firmware version displayed on the control panel screen. If the firmware structure change is not permissible, contact your service representative before logging in.
When "Change Firmware Structure" is set to [Prohibit], administrator authentication must be enabled.
After [Prohibit] is specified, disable administrator authentication. When administrator authentication is enabled again, you can return the setting to [Do not Prohibit].
If you select [Do not Prohibit], firmware structure change detection is disabled.
Default: [Do not Prohibit]
Password Policy
The user administrator can specify this.
This setting allows you to specify [Complexity Setting] and [Minimum Character No.] for the password. By making this setting, you can only use passwords that meet the conditions specified in "Complexity Setting" and "Minimum Character No.".
If you select [Level 1], specify a password using a combination of 2 types of characters selected from upper-case letters, lower-case letters, decimal numbers, and symbols such as #.
If you select [Level 2], specify a password using a combination of 3 types of characters selected from upper-case letters, lower-case letters, decimal numbers, and symbols such as #.
Default: [Off]. There are no restrictions on the number of characters, and the types of characters are not specified.
Settings by SNMPv1, v2
The network administrator can specify this.
If SNMPv1 or SNMPv2 protocols are used to access the machine, authentication cannot be performed, so that paper settings or other settings that the machine administrator specifies can be changed. If you select [Prohibit], the setting can be viewed but not specified with SNMPv1, v2.
Default: [Do not Prohibit]
Security Setting for Access Violation
The machine administrator.
When logging in to the machine via a network application, a user may be locked out by mistake because the number of authentication attempts by the user does not match the number of the attempts specified on the machine.
For example, access may be denied when a print job for multiple sets of pages is sent from an application.
If you select [On] under "Security Setting for Access Violation", you can prevent such authentication errors.
On
Denial Durtn. for Accs. Viol.
Specify how many user accesses are allowed.
Use the number keys to specify the value between "0" and "60", and then press [
 ].
].Default: [15]
Managed User Host Limit
Specify how many user accounts can be managed under "Security Setting for Access Violation".
Use the number keys to specify the value between "50" and "200", and then press [
].Default: [200]
Password Entry Host Limit
Specify how many passwords can be managed under "Security Setting for Access Violation".
Use the number keys to specify the value between "50" and "200", and then press [
].Default: [200]
Status Monitor Interval
Specify the monitoring interval of "Managed User Host Limit" and "Password Entry Host Limit".
Use the number keys to specify the value between "1" and "10", and then press [
].Default: [3]
Off
Default: [Off]
Password Entry Violation
The machine administrator can specify this.
If the number of authentication requests exceeds the number specified by the setting, the system recognizes the access as a password attack. The access is recorded in the Access Log and the log data is sent to the machine administrator by e-mail.
If the "Max. Allowed No. of Access" is set to [0], password attacks are not detected.
Max. Allowed No. of Access
Specify the maximum number of allowable authentication attempts.
Use the number keys to specify the value between "0" and "100", and then press [
].Default: [30]
Measurement Time
Specify the interval between repeated authentication attempts that result in authentication failures. When the measurement time elapses, the records of authentication attempts are cleared.
Use the number keys to specify the value between "1" and "10", and then press [
].Default: [5]
![]()
Depending on the values specified for the settings for [Max. Allowed No. of Access] and [Measurement Time], you may receive violation detection e-mails frequently.
If you receive violation detection e-mail s frequently, check the content and review the setting values.
Device Access Violation
The machine administrator can specify this.
If the number of login requests exceeds the number specified by the setting, the system recognizes the access as an access violation. The access is recorded in the Access Log and the log data is sent to the machine administrator by e-mail. Also, a message is displayed on the control panel and on Web Image Monitor.
If the "Max. Allowed No. of Access" is set to [0], access violations are not detected.
In "Authentication Delay Time", you can specify response delay time for login requests to prevent the system from becoming unresponsive when an access violation is detected.
In "Simultns. Access Host Limit", you can specify the maximum number of hosts that access the machine at one time. If the number of simultaneous accesses exceeds the number specified by the setting, monitoring becomes unavailable and the machine's monitoring status is recorded in the Log.
Max. Allowed No. of Access
Specify the maximum number of allowable access attempts.
Use the number keys to specify the value between "0" and "500", and then press [
].Default: [100]
Measurement Time
Specify the interval between excessive accesses. When the measurement time elapses, the records of excessive accesses are cleared.
Use the number keys to specify the value between "10" and "30", and then press [
].Default: [10]
Authentication Delay Time
Specify authentication delay time when an access violation is detected.
Use the number keys to specify the value between "0" and "9", and then press [
].Default: [3]
Simultns. Access Host Limit
Specify the number of acceptable authentication attempts when authentications are delayed due to an access violation.
Use the number keys to specify the value between "50" and "200", and then press [
].Default: [200]
![]()
Depending on the values specified for the settings for [Max. Allowed No. of Access] and [Measurement Time], you may receive violation detection e-mails frequently.
If you receive violation detection e-mails frequently, check the content and review the setting values.