Use the [Preview] screen to check that originals have been scanned correctly.
This section explains about the [Preview] screen that can be used before sending files by e-mail or Scan to Folder, the DSM scanner, or delivering files.
Before you start scanning, press [Preview]. If you scan originals while [Preview] is selected, the [Preview] screen appears.
You can start or cancel sending the files after checking the preview and the scan settings used for scanning.
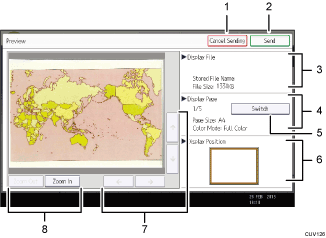
[Preview] screen

[Cancel Sending]
Press to close a preview and interrupt a transmission.
[Send]
Press to close a preview and continue a transmission.
Display File
Displays a file's name and size.
Display Page
Displays the number of the currently displayed page, total number of pages, page size, and color mode.
[Switch]
Press to change the page of the selected file that is displayed.
Display Position
Displays the position of an image when enlarged.
[
 ][
][ ][
][ ][
][ ]
]Press to shift the displayed area.
[Zoom Out] and [Zoom In]
Press to reduce or enlarge the displayed preview.
![]()
Preview is not available if you are scanning by WSD. View the scanned images on the destination computer instead.
Preview is not available if a file is scanned using [Store to HDD]. You can view a stored file using the [Preview] screen displayed from the list of stored files. For details about viewing a stored file, see "Checking a Stored File Selected from the List", Scan.
Preview is not available if you select [High Compression PDF] as the file type.
Preview might not be displayed if scanning failed or the image file is corrupted. If this is the case, scan the original again.
