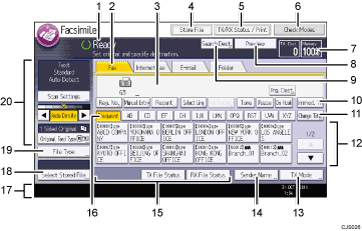
Operational status and messages
Displays operational status and messages.
Fax, Internet Fax, E-mail, and Folder
Press a tab to switch the transmission type between the [Fax] screen, [Internet Fax] screen, [E-mail] screen, and [Folder] screen.
When
 (Fax) is selected, you can specify fax numbers or IP-Fax destinations.
When
 (Internet Fax) is selected, you can specify Internet Fax destinations.
When
 (E-mail) is selected, you can specify e-mail destinations.
When
 (Folder) is selected, you can specify folder destinations.
Entered number
Displays the entered number of a destination.
[Store File]
Allows you to store documents in the Document Server.
For details about storing documents, see "Storing a Document", Fax.
[TX/RX Status / Print]
Press to display various information about communication.
For details about confirming information, see "Changing/Confirming Communication Information", Fax.
[Check Modes]
Allows you to confirm the transmission settings.
Memory
Displays the percentage of free memory space.
[Preview]
Allows you to check the scanned original before sending it.
[Search Dest.]
Allows you to search for a destination by destination name, fax number, e-mail address or registration number.
For details about a destination search, see "Using the Address Book to Specify Destinations", Fax.
[Immed. TX]
Switches transmission mode to Immediate Transmission.
When [Immed. TX] is not highlighted, the machine is in the Memory Transmission mode. For details about Memory Transmission and Immediate Transmission, see "Transmission Modes", Fax.
[Change Title]
Switches the type of title word keys. For details, see "Switching the type of title in the Address Book", Fax.
Destination list
The list of destinations registered in the machine appears. If all of the destinations cannot be displayed, press [
 ] or [
 ] to switch the screen.
The (
 ) symbol indicates a group destination.
[TX Mode]
Allows you to set various features for transmission. For details about setting the features, see "Other Transmission Features", Fax.
[Sender Name]
Allows you to set a sender.
Quick Operation keys
Displays Quick Operation keys set for frequently used functions. [TX File Status] and [RX File Status] are preset.
For details about Quick Operation Key, see "General Settings", Fax.
Title word keys
Title word keys appear. Allows you to switch from one page (display) to another on the destination list.
Notice board
Displays the name and fax number of the destination and the size of the data being transmitted.
[Select Stored File]
Allows you to send or print the documents stored in the Document Server.
[File Type]
Allows you to select the file type.
Original and scanning settings
Allows you to specify scan settings and original feed types.
![]()
The Facsimile Features menu includes a user parameter setting (switch 17, bit 3) that enables you to configure the machine to return to standby mode whenever it finishes scanning an original. For details, see "Parameter Settings", Fax.
When the following settings are set to [On] in the Facsimile Features menu, transmission type tabs are displayed. For details about these settings, see "Initial Settings", Fax.
 (Internet Fax): When [Internet Fax Setting] is set to [On].
 (E-mail): When [E-mail Setting] is set to [On].
 (Folder): When [Folder Setting] is set to [On].
Information about documents sent using the facsimile function cannot be checked in the [Job History] screen. Use [TX/RX Status / Print].
