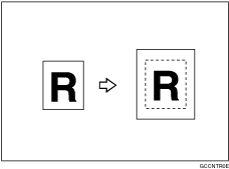
Centering
You can make copies with the image moved to the center.
![]() (mainly Europe)
(mainly Europe)
Original placed on: |
Original size and orientation |
|---|---|
Exposure glass |
A3 |
ADF |
A3 |
![]() (mainly North America)
(mainly North America)
Original placed on: |
Original size and orientation |
|---|---|
Exposure glass |
11 × 17 |
ADF |
11 × 17 |
![]() Place the originals.
Place the originals.
![]() Press [Edit Image].
Press [Edit Image].
![]() Press [Edit Image].
Press [Edit Image].
![]() Press [Centring].
Press [Centring].
![]() Press [OK] twice.
Press [OK] twice.
![]() Press the [Start] key.
Press the [Start] key.
![]()
Original sizes and orientations for centering are listed below.
Confirm the original size and the paper size beforehand. If the original size is not detected automatically, enter the size using the number keys.
The position of centering might shift when original size is selected automatically as a custom size.