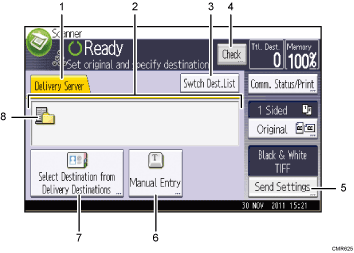
This section describes the screen layout when using the network delivery scanner.

Delivery Server
This tab is highlighted when the delivery scanner function is being used.
Destination field
The specified destination appears. If more than one destination has been specified, press [
 ] or [
 ] to scroll through the destinations.
[Swtch Dest.List]
Press to switch to the [Email] screen, [Scan to Folder] screen, or the [WSD] scanner screen.
[Check]
Allows you to confirm the scanning settings.
[Send Settings]
Specify the subject, sender, and whether or not to enable Message Disposition Notification for the file to be transmitted.
[Manual Entry]
To send a file by e-mail via the delivery server to a destination not registered in the delivery server's destination list, press this key to display the soft keyboard. Then use the soft keyboard to enter the e-mail address. For details about how to send a file by e-mail via the delivery server, see ScanRouter delivery software manual.
[Select Destination from Delivery Destinations]
The list of destinations registered in the delivery server appears. If all of the destinations cannot be displayed, press [
 ] or [
 ] to switch the screen.
The (
 ) symbol indicates a group destination.
Network delivery scanner icon
Indicates that the network delivery scanner screen is displayed.
![]()
The ScanRouter delivery software is no longer available for sale.
